Thursday, 27 July 2017

Stampin' Up - Art With Heart - Favourite Colour Combination Blog Hop - July 2017


The Art with Heart Team ladies are selecting their favourite colour combinations to share with you tonight. Choosing the right colour scheme can be essential to your design and with Stampin’ Up!s stunning collection, there are 50 colours to choose from. There’s sure to be some combinations that work really well together and you can take inspiration from.
Now sit back and enjoy some time out of your day to cruise through our blog hop and soak up some colour explosion eye candy! 
Well I don’t know about you but when I saw the new In Colours this year I went WOO HOO! I know not everyone gets excited about colour but I do and I have just given you a hint as to what my favourite colour combo is at the moment. Well it probably will be for a long time to come. Check out a photo that my son took of me holding up the cards I made.

See the shirt I am wearing? Another hint to the colours! Yes you guessed it my colour combo for you today is Powder Pink, Berry Burst, Fresh Fig, Rich Razzleberry and lets add in a little Basic Grey to make the colours pop!
Climbing Orchid, Climbing Orchid Bundle, Climbing Orchid builder Framelits

I have made my card 2 ways for you today. One is 3D and one is a flat version. They are both embellished exactly the same so you can see the difference it makes to the card to add that little bit of dimension.
I have been playing with the Bokeh technique a little bit lately because of the ATC swap that we have done in our Art With Heart group and I made a little bit extra using my favourite colour combination to use for our cards today and our blog hop. You can check out the technique on my Christmas post.
Climbing Orchid, Climbing Orchid Bundle, Orchid Builder Framelits

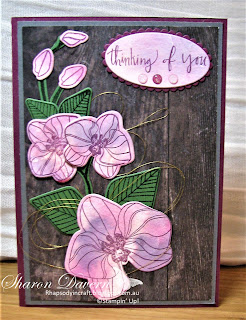
I have used the Climbing Orchard stamp set and Orchard builder framelits to create both my cards today. The Orchard is stamped in Rich Razzleberry and then clear embossed before being cut out with the Orchard builder framelits. The leaves and branches are also clear embossed in garden green on garden green cardstock. The leaves are cut out with the framelits but the branches are fussy cut. I have used Gold Metalic Thread to add some bling to the orchards along with the Glitter enamel dots with the sentiment which is also clear embossed with Rich Razzleberry on the Bockeh technique backgound paper and then cut out with the layering oval thinlits. 
The background paper had all 4 beautiful colours used to make the gorgeous effect. Powder Pink, Berry Burst, Fresh Fig and Rich Razzleberry. Each Orchard comes out so differently because of how the ink ran into each other and blended.
Climbing Orchid, Climbing Orchid Bundle, Orchid Builder Framelits

With the 3D version of the card I cut out the individual parts of the orchard and layered them up on the mini dimensionals that we now have with Stampin’ Up, I just love them! 

Again I have used all the same embellishing bling. It really just adds a little bit more to your card to make it 3D. Both cards have been layered on the gorgeous Wood Textured DSP and Basic Grey Card Stock before being placed on a Rich Razzleberry cardbase. Aren’t you just loving the wood textured DSP I sure am!
Climbing Orchid, Climbing Orchid Bundle, Orchid Builder Framelits

On the inside of the card I have stamped the image of the orchard in Rich Razzleberry, a card is never complete without a little decoration on the inside.

For more product information check out the list below.
PRODUCTS
Stamps
Climbing Orchard
Card Stock and Papers
Water Colour Paper, Very Vanilla, Basic Grey, Rich Razzleberry, Wood Textures DSP
Ink
Powder Pink, Berry Burst, Fresh Fig, Rich Razzleberry, Craft Stampin’ Ink.
Acecessories / Embellishments
Glitter Enamel dots, Gold Metallic Thread
Tools
Paper Snips, heat tool, Aqua Painter, Circle Layer thinlits, acertate, sponge dauber, embossing buddy, clear emboss powder, big shot, Orchard Builder framelits, stampin’ dimensionals, mini stampin; dimensionals, Layering Ovals thinlits, fast fuse.

 
Please don't hesitate to contact me for details on how to make this card or on how to get your hands on the annual catalogue and any of your Stampin' Up goodies.
Now it’s time to hop on over to our next participant, the very talented and lovely Tina Gillespie. 
    
If you find a broken link or have come to this blog hop from a different entry point, you can view the participants below:
1.      Catherine Proctor
2.      Sharon Davern
3.      Tina Gillespie
4.      Kathryn Ruddick
5.      Andrea Roberts
6.      Rebecca Jacovou
7.      Monika O’Neill
8.      Caroline Manwaring
9.      Rachel Woollard


Hope you have a lovely day. Thank you for spending some time with me.
Take Care

Wednesday, 26 July 2017

The Heart of Christmas - Week 9


Hello and welcome to another beautiful day and week 9 of The Heart of Christmas with the team from Art with Heart.
Wow there are only 19 Wednesdays including today until the last week of November.  I don’t know whether I am wanting to know how many weeks are left but I am loving doing a Christmas card each week. I just love Christmas so this is like having Christmas all year round for me!

Make sure you hop over to the lovely Claire Daly’s blog to see the list of the rest of the team that has played along this week to inspire your Christmas creations.

As you may remember from last week I started on a series of One Page Wonder cards, so I am continuing with another this week using some more of the pieces of Be Merry Designer Series Paper that we cut up last week.


The card that I have made this week uses just 2 narrow strips 1/2'’x5 1/2”. I knew straight away that I would use these 2 strips with the Star of Light stamp set and Starlight thinlits. They make the perfect border framing the star almost as if the lines on the DSP are the lines of a shooting star, shooting across the sky!


I have cut out the solid shape of the star in gold foil paper and then layered each star on top with our fine tip glue. Dazzling diamonds, Cherry cobbler and more gold foil paper finishes of the star perfectly. Popper up on the stampin’ dimensionals above a swirls of cherry cobbler stars.

The sentiment “Guide us to thy perfect Light.” And “The Light of Heaven” are stamped in cherry cobbler and then clear embossed to add a little more sparkle!

On the inside of the card is the perfect matching sayings that Stampin’ Up has with their stamp sets, which I have stamped in cherry cobbler over a smoky slate swirl of stars. It is lovely to do a little bit of decoration on the inside of your cards.

For more product information check out the list below.
PRODUCTS
Stamps
Star of Light
Card Stock and Papers
Whisper White, Cherry Cobbler, Be Merry DSP, Gold Foil, Dazzling Diamonds Glimmer Papper.
Ink
Cherry Cobbler, Smokey slate
Acecessories / Embellishments

Tools
Big Shot, Starlight Thinlits, Stampin’ Dimensionals, Trimmer, Fast Fuse, Fine-tip glue pen, bone folder, clear embossing powder, heat tool, embossing buddy

Don’t forget to pop over to our team leader’s blog Claire Daly for some more Christmas inspiration.

Please contact me for any more information on how to make this card, on how to get your hands on the Annual Catalogue and any of your Stampin’ Up goodies.

Hope you have a lovely day. Thank you for spending some time with me.


Take Care

Wednesday, 19 July 2017

The Heart of Christmas - Week 8


Hello and welcome to another beautiful day.

Wow there are only 2o Wednesdays including today until the last week of November.  I have been really busy this week and when you think that there are only 20 weeks left until December you just wonder where the year is going so it is fantastic that we get to make Christmas cards together each week.

Make sure you hop over to the lovely Claire Daly’s blog to see the list of the rest of the team that has played along this week to inspire your Christmas creations.

Well this week I have been busy making candles and cards. I organise a social get together for the ladies at my church once a month and in July we do Christmas in July. So my card from 2 weeks ago inspired my candle creation.
 

I always like to give the ladies a little gift for Christmas in July and this year I chose candles. I had 22 ladies come to the dinner and I don’t suggest you try and adhere all 22 stamped images to the candles at once.

You might want to pace yourself.  Do 3 or 4 for a table setting for your Christmas dinner!
For more product information check out the list below.
PRODUCTS
Stamps
Nature Sings, Sheet Music
Card Stock and Papers
Tissue Paper
Ink
Smoky Slate, Early Espresso, Soft Suede, Old Olive
Acecessories / Embellishments

Tools
Paper Snips, heat tool

Well I didn’t want to miss out on making a card as well this week so I have done that as well as the candles. This weeks inspiration came from one of our lovely team members Kathryn Ruddick who had her team around for a 1 page wonder night. Where they made a number of cards using 1 sheet of 12x12 Designer Series paper (DSP). I had never done this and I wanted to give it a try. I have looked on line for a few different templates and I have modified a few out there and this is what I have ended up with. Plus being interrupted by the kids a couple of times so when I was cutting, a couple of the cuts were not what I was planning. But hey lets see what we make with them over the coming weeks.


This is the sheet of DSP from the Be Merry Designer Series Paper pack.
When cutting with a pattern on one side of the sheet make sure you turn it up the right way when you cut your DSP.


This is the other side.

For the first card I used Nature Sings, what a lovely stamp set this is, I am really loving this stamp set.

I have cut out each image using the stitched shapes famelits and layered them with garden green which I cut using the layering squares framelits. The sentiment I have cut out again with the stitched shapes framelit, backed with garden green cardstock, cut out with the layering circles framelits.  The little saying at the bottom of the card was punched out perfectly with the classic label punch. The piece of DSP I used 5 ½” x3” backed by garden green card stock is adhered to the cherry cobbler card stock  then every layer is popped up on Stampin dimensionals except the trees and little deer.


Inside I have stamped the trees and deer  along with the little verse from the stamp set in smokey slate.
For more product information check out the list below.
PRODUCTS
Stamps
Nature Sings
Card Stock and Papers
Whisper White, Cherry Cobbler, Garden Green, Be Merry DSP
Ink
Old Olive, Soft Suede, Early Espresso, Smokey slate
Acecessories / Embellishments

Tools
Big Shot,  Stitched shaped framelits, Layering Square  Framelits, Layering Circle Framelits, Classic Label punch, Stampin’ Dimensionals, Trimmer, Snail, bone folder

Well I think we are going to be able to make a lot of cards out of this one piece of DSP so I made another one while I was at it. I wanted to make one with the other side of the DSP showing.

I have the Nature Sings stamps set paired back up with Sheet Music

I have stayed with the same colours of cherry cobbler and garden green which is what is in the Be Merry DSP and this time added some gold bling with the gold foil paper and gold metallic thread. How gorgeous is the Old Olive Stitched-Edge Ribbon which is new this year? The DSP is 2 ½ “ x 5 ¼ “ piece and the sheet music is stamped on whisper white and has been cut to the same size and then stuck to the gold foil paper before adding the gorgeous old olive stitched-edge ribbon.  This time I have used the oval shape in the stitched shaped framelts and used the oval layering framelits in garden green. I have added some bling with the gold metallic thread with little loops off the edge of the deer cards. I have popped them ovals up on dimensionals and stamped out the sentiment and cut out in the oval the same as the deer.  The Classic label punch works beautifully for “…and heaven and nature sings”

In the Center of the card I have stamped the deer and the trees and the verse in smokey slate.
PRODUCTS
Stamps
Sheet Music, Nature Sings
Card Stock and Papers
Whisper White, Cherry Cobbler, Garden Green, Gold Foil, Be Merry DSP
Ink
Old Olive, Soft Suede, Early Espresso, Smokey Slate
Acecessories / Embellishments
Gold Metallic Thread
Tools
Big Shot,  Stitched shaped framelits, Layering Ovals Framelits, Classic Label Punch, Stampin’ Dimensionals, Trimmer, Snail, fast fuse, bone folder

Don’t forget to pop over to our team leader’s blog Claire Daly for some more Christmas inspiration.
Please contact me for any more information on how to make this card, on how to get your hands on the Annual Catalogue and any of your Stampin’ Up goodies.

Hope you have a lovely day. Thank you for spending some time with me.


Take Care

Wednesday, 12 July 2017

The Heart of Christmas - Week 7


Hello and welcome to another beautiful day.

In this week’s Heart of Christmas get together I have used the Bokeh technique for the background and the Merry Mistletoe stamp sets. (p113 annual catalogue)

So let the countdown continue …..there are only 21 Wednesdays including today until the last week of November.  

This week I thought I would use the Bokeh technique for the background to my card as it is the technique that we are using for our ATC (Artist Trading Card) swap over at Art With Heart this month. I have never done this technique so I thought why not give it a go for my Christmas card this week as well.

What do you think? Quite a pretty background!

I have photographed  the steps as I made the card so you can see how I made the Bokeh background.
  1.         Tape down a piece of water colour paper with washi tape
  2.          Wet thoroughly with your aqua painter the paper so that the ink can run
        
  3.  Choose your colours. You can use re-inkers but as I didn’t have them in the colours I wanted to use  that is ok you can use your ink pads.
  4.   Squeeze the lid of your ink pads onto the pad so that some ink is left on the lid, use your aqua painter to lift up the ink with lots of water and drop onto the paper. Make sure if you want to use more ink and when you have finished to dry up any water residue with kitchen paper towel so that you don’t get water on your ink pad.
  5.    This is after Daffodil delight. You just drop little bits of ink in different places over your paper. The next colour will bleed right into the next colour.
  6.  Garden green
  7. Real red now making sure you now cover any white patched left.
  8. Now leave to completely dry or use your heat tool to speed up the process.
  9. Once completely dry comes the Bokeh effect. So you could see what I am going to do next. I have cut some circles in an off cut of vellum but you can do it in acetate. I used the 4 smallest layering circle framelits.


10.Randomly place the circles over your dry paper and using your white craft pigment ink with a sponge dauber create over lapping circles.

11. To finish the card I have stamped the greeting from Merry Mistletoe Stamp set in on Whisper white card and cut it out with an oval stitched shaped framelit, cut out a real red scalloped oval to layer your greeting.
12. Cut an A4 piece of real read card stock in half the fold in half for your card base. 13. Cut a mat of Whisper white cardstock of 14.5 cm x 10 cm and adhere to the card base.
14.  Cut your Bokeh background to 9.5cm x 14 cm and adhere to your card base. 
15.  Pop your greeting up on dimensionals and center on your card . 
16. Lastly  add some bling with random rhinestones.

For more product information check out the list below.
PRODUCTS
Stamps
Merry Mistletoe
Card Stock and Papers
Whisper White, Real Red, Water colour Paper
Ink
Memento, Daffodil Delight, Garden Green, Real Red, Craft Whisper White pigment ink.
Acecessories / Embellishments
Rhinestones basic jewels
Tools
Big Shot,  Stitched shaped framelits, Layering Ovals Framelits, Stampin’ Dimensionals, Trimmer, Snail, bone folder

Make sure you pop over to the lovely Judy May's blog this week for some more Christmas inspiration and a list of other lovely team members who played along this week

Don’t forget to contact me for any more information on how to make this card, on how to get your hands on the Annual Catalogue and any of your Stampin’ Up goodies.

Hope you have a lovely day. Thank you for spending some time with me.

Take Care