I thought well leaves need to have a little green so I picked up my dark Old Olive Stampin' Blend and added just a touch to the leaves. I backed it in Basic Black and put it on a card base of Basic Black and Rococo Rose that has been put through the Cut & Emboss machine in the Tasteful Textile 3D Embossing folder. The sentiment is from the Retiring set Here's A Card so make sure you get your hands on that set if you haven't already it is one of my favourites for sentiments. The Silver edged satin ribbon is coloured in using the dark Rococo Rose Stampin' Blend.
Wednesday, 31 March 2021
Week 42 = Colour Creations Showcase - "Rococo Rose"
I thought well leaves need to have a little green so I picked up my dark Old Olive Stampin' Blend and added just a touch to the leaves. I backed it in Basic Black and put it on a card base of Basic Black and Rococo Rose that has been put through the Cut & Emboss machine in the Tasteful Textile 3D Embossing folder. The sentiment is from the Retiring set Here's A Card so make sure you get your hands on that set if you haven't already it is one of my favourites for sentiments. The Silver edged satin ribbon is coloured in using the dark Rococo Rose Stampin' Blend.
Wednesday, 24 March 2021
Week 41 - Colour Creations Showcase - "Rich Razzleberry"
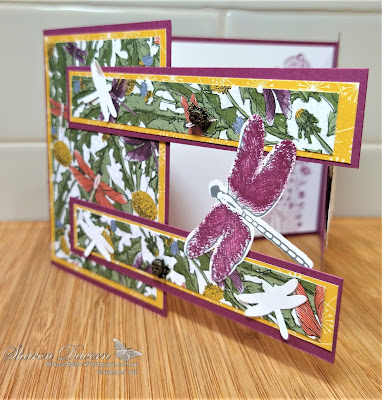
I have created a cross over gatefold card for you. I have made a cross over card once before but I saw this design with the dragonfly by Gloria Kremer and I wanted to give it a try for my young friend. I have made a thank you card as I wanted to give a card to a young lady that played violin for me on Sunday to help accompany a song I conducted for our church choir. Her playing was just gorgeous. I know that she and her mother have quite the garden so I thought I would use this bundle to create a fun card for her. She is such an amazingly talented musician I love hearing her play.
For this card I have used the Rich Razzleberry as the base of the card as well as for the cross over layers. The base of the card is half of the A4 cut at 10.5 cm vertically and then folded the 2 ends in to meet in the middle Then I have layered the front with 2 different pieces of the Dandy Garden 6x 6 DSP. The Bumblebee layer to add contrast with the Rich Razzleberry and the predominant flower and mossy meadow layer. The strips across the middle are layered the same way.
In the centre of the card I have stamped the sprig of flowers in Rich Razzleberry. You can't leave the inside blank.
The middle cross over strip is attached on the right hand front fold and I have also stamped and punch out a thank you. To make this I first punch out the label with the Label me fancy punch in Basic White then with the "Thank You for your Kindness" Stamp from the Dragonfly Garden stamp set I put sticky tape over all the words except the "Thank" inked it up in Basic Grey took off the tape and then stamped on the label. Cleaned the stamp and then repeated the process with the sticky tape over all the word except the "You"
Wednesday, 17 March 2021
Week 40 - Colour Creations Showcase - "Real Red"
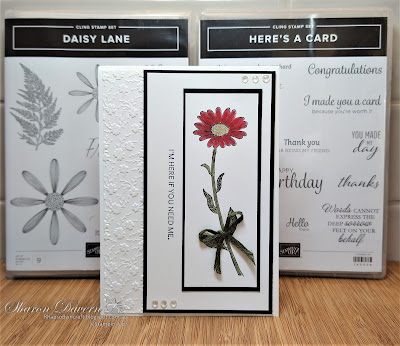
The sentiment that I have added to the side of the daisy on the layer below is from the Here's A Card Stamp set, I love that stamp set and I used my Stamparatus to make sure I had it all lined up and in the right spot before stamping in memento black ink like I had with my daisy before colouring it in.
I am dedicating this card to my friends who have been there for me, I am here for you and especially a dear friend that I have spoken about a bit in the past weeks as her uncle has passed away and her husbands uncle has as well, now her mother is very sick in hospital. We all need out friends no matter what is going on in our lives but especially when we are going through very hard and difficult times. Maybe make a card for a friend today and let them know you are thinking of them.
Thursday, 11 March 2021
AWHT - Creative Showcase - March 2021 - Sketch Challenge
Welcome to the March Creative Showcase, I am so happy to be able to finally be taking part this year in the monthly showcase. I have had life get in the way and I was determined not to let it this month.
This month the team are working on a sketch challenge that has been set by our lovely host Rachel.
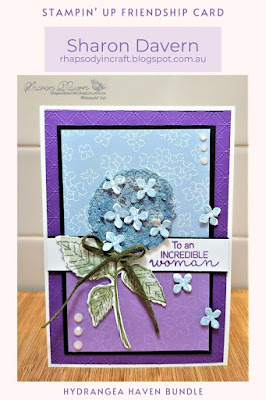
I actually love a good sketch challenge and I have taken this one very literal!I do have a confession, one of the first stamp set bundles from the Jan-June Mini that I purchased was the Hydrangea Haven Bundle. This was the first time I have used it! I know shock horror! Well this is the card I came up with.
I have taken the colours from the Hydrangea Hill DSP and used them as my guide. I don't know what took me so long to get this bundle out as it is so much fun.
As you can see I have started with a Thick Basic White card base and layered with an embossed Dainty Diamonds piece of Gorgeous Grape card stock and then leaving a little border I have layered 2 of the more muted and less busy sides of the Hydrangea Hill DSP with a piece of Basic Black to make it pop.
For the stamped image of the hydrangea I have stamped it in Basic Grey and then filled it in with mossy meadow and the blue is misty moonlight but I have stamped off once so it is not quite so dark. Then I put it through the die cut not only cut it out but also to cut the flowers.
You can see here in this photo that there is an extra die that you can put your flower through and it will add this great pop ups on your hydrangea for extra texture. The little flowers are also die cut out and then I stamped Seaside Spray on after on the Basic White Card.
To finish off my card I have stamped the fabulous sentiment in gorgeous grape and layered that under the popped up hydrangea and used the great Mossy Meadow braided linen trim from the Dandy Garden suite in the Jan-June Mini and you always need a little bling and I have opted for the elegant faceted gems but you could also use the pastel pearls that come with the Hydrangea Hill suite.
I am so glad that I was able to be back for the month Creative showcase and I can wait to see who else played along today from the team and how they interpreted the sketch so please head over to our host with me Rachel to see some fabulous creations from the team: Rachel's Blog
If you have any questions about my card today or would like to get your hands on these gorgeous products and have a go yourself please do not hesitate to contact me.
Wednesday, 10 March 2021
Week 39 - Colour Creations Showcase - "Purple Posy"
Week 39 of Colour Creations Showcase and in some ways it feels like just yesterday and on the other hand a life time ago we started this fabulous weekly sharing of colour inspiration. I think I am feeling a little nostalgic today as we got the keys to the house for my son yesterday and we are all systems go at cleaning and getting appliances and moving him in to his new place. EEEK! My baby is leaving home!
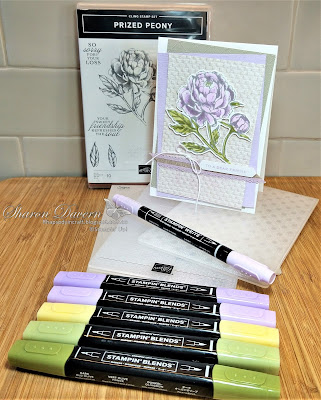
So with all this excitement I have made one card for you this week and when I thought of Purple Posy I couldn't help but continue with the alliteration on a card of a Purple Posy Prized Peony! Phew!
Well that was a mouthful! HEHE!
Here is the card that I made for you.
I have focused on the gorgeous large peony stamp of the Prized Peony stamp set and added layers of texture with 3 different embossing folders.
Firstly I coloured the gorgeous peony with the Stampin' Blends after stamping the image in Smokey Slate. I used Light and Dark Purple Posy and Old Olive and Light So Saffron as my colours. I love the way Stampin' Up gives us help with our colouring and shading with their stamped images as all you have to do is add the darker Purple posy to the shaded areas of the image and then blend in the light over the top and work your way out. I left a little white as well for the a 3 toned rose.
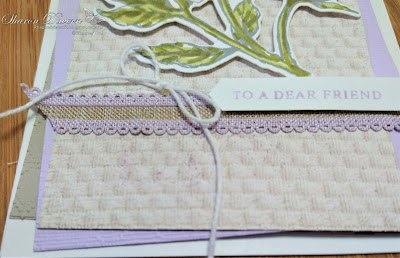
For the layers of the card under the Prized Peony I have a Sahara Sand embossed in Dainty Diamonds, Purple Posy embossed twice with the Subtle 3D folder and the In Good Taste DSP has been embossed Tasteful Textiles 3D folder. I have popped everything on a card base of Thick Basic White.
Now I don't know if you can spot one more thing on the In Good Taste DSP? I have used the Purple Posy Stampin' Write Marker and sprinkled or splattered depending on your definition some ink all over the layer before I embossed it.
Ok 1 final element is the sentiment and as we don't have an ink pad I used the Stampin' Write marker on the "Love & Thanks to a dear friend" stamp from the Prized Peony stamp set and just inked the "To a dear friend" and then punched it out with the Classic Label Punch.
If you would like any more information on my card today or you would like to have a little bit of a play with some product please don't hesitate to contact me.
Wednesday, 3 March 2021
Week 38 - Colour Creations Showcase - " Pumpkin Pie"
For the layers of my card I have Basic Black for the card base and have layered Pumpkin Pie then a piece of In Good Taste DSP over that before die cutting out in Gold Foil a frame using the Ornate layer dies. I then cut the centre out of the gold with my paper trimmer. I can use that piece another time. I adhered all of that together then made my Pumpkin Pie frame with the stitched rectangle dies.
As you can see here I have popped the frame and the flowers up on mini dimensionals and then adhered it slightly diagonally. Before I did any of that I will tell you how I built the flower frame.
I also did the leaves this way in Mossy Meadow but I only stamped of 1 time instead of 2 times. I then adhered the flowers to the frame with a little bit of Tombow multipurpose glue and trimmed off the excess along the edge of the frame. I then added the leaves and the glimmer ribbon and went to town with the mini dimensionals before adhering to the card and placing the sentiment also on mini dimensionals and to finish off with the matte black dots that you can find in the Jan-June Mini. I am really loving those!


