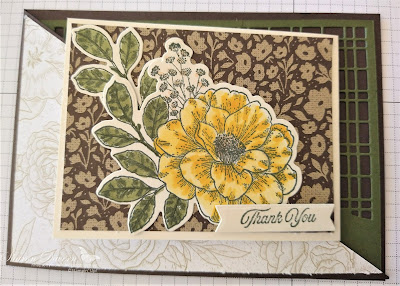
Thank you for joining us on World Card Making Day! Each year on the first Saturday in October we set aside the day to make cards. This year the lovely Kathryn Mangelsdorf put a call out for some of us to do a blog hop as well. What a fantastic idea Kathryn. Thanks for hosting our hop!
I love making fancy fold cards, they don't have to be super difficult and this one is just a couple of cuts and folds. It is called a Diagonal Joy Fold Card. I need to make around 20 thank you cards for my daughters 21st that we have just had and I thought a nice easy fancy fold would be just the ticket!
Now you can decorate them anyway you like but the base of the card is easy to make. Let me take you through the steps after choosing your colour scheme and I used the Abigail Rose DSP for my base colour palette.
Step 2. Cut in half and then using the middle score line cut from there to the bottom of the card base diagonally. Do this for both cards and you will have 2 card bases.
Step 3. Choose the DSP that you would like to use and cut it to the size that is the first layer that you would add to your base card. I cut mine to 10 x 14.4cm. Cut these diagonally into triangles. (As you can see the one side I can use for my basic grey bases and the other side for my Early Espresso bases)
Step 4. Cut the card that will become the other folding part and where you write to your receiver of the card. Mine are 8 x 21 cm. score and fold in half.
Step 5. Sorry no photo cut DSP that you wish to go under your focal point flower 7.5 cm x10 cm
Step 6. Cut another piece of DSP or you could cut a piece of Mossy Meadow card the size of 10 x 14.4 cm and your the split card textured dies. I thought it would look like the flowers had a lattice background.
Step 7: Stamp your flowers and leaves and your sentiment. I have done both on Very Vanilla and Basic White to go with the colours of my cards. I have used the Cottage Rose Stamp for the flower and the Celebrating you for the Thank you stampStep 8: Die cut and colour your roses and leaves. I used the cottage Rose Dies to cut these out and then the wonderful Stampin' Blends to colour them in. Don't they look wonderful all together.
Now we can assemble our card.
Step 10: Adhere the triangle to the front of the card. Start with the tip it makes it easier.Step 11: Place adhesive on the back of your folded writing section and slide it under your triangle fold and adhere to the lattice base card.It is easier to make sure you have it centred if you slide it in carefully before pushing down and adhering.
Step 12: Decorate the front of your card anyway you like. See the thank you I have cut that out using the Celebrations Tag Dies. It was the perfect fit!
Here is half of them but all 20 are complete ready to be written in and sent out this week. Oh and I couldn't help but put on some bling with the gorgeous Iridescent Pearls.
I do hope those steps were helpful and will encourage you to try making the base and you can decorate it with your stamps and in your style but if you have any questions about my project today don't hesitate to contact me.
Now is the time to head to the next person on our World Card Making Day Hop and that will be the very talented artist Kathryn Ruddick, I love how she adds colour to her projects so just hit the next blog button below and you will head straight there. I can't wait to see what she has for us!
If at any time there is a broken link our lovely host Kathryn Mangelsdorf will have a list of those participating and you can continue your hop from there. Click here to go to Kathryn's Blog
Thank you for spending some World Card Making Day crafty time with me today, take care,


OMG, you are amazing to not only make all of those cards, but to stamp and colour all of those flowers!! They are all so beautiful, and I love how much thought you've put into each layer.
ReplyDeleteWow!! So amazing!! Brilliant design and gorgeous colouring!!
ReplyDeleteFrom Julia!!
ReplyDeleteWow another fancy fold card, love all those colour combinations, great colouring. It's always lovely to send thank you cards. Thanks for joining the blog hop.
ReplyDeleteLovely card design Sharon, and oh my goodness! I can’t believe you made so many! Go you!!
ReplyDeleteWow Sharon - what a task. Love your cards - what a delightful way to say thanks. Thank you for all the detail - I must give them a try. You are amazing xxx
ReplyDeleteWhat a. Fabulous collection of beautifully coloured cards. Thanks for the detailed instructions. These are lovely
ReplyDeleteI love fancy folds too, and I haven't seen or tried this design for a while. It is so impressive with all t he DSP layers and your beautifully coloured flowers. Loved the instructions too. Great cards!
ReplyDeleteWhat a fun and exciting fun fold card. You've used such a great selection of dsp for the panels and your beautifully coloured flowers just bring the cards to life. Very impressive. Thanks for sharing the instructions.
ReplyDelete