Sunshine has some new members on the DT so they are participating in the blog hop this time so I know that you will have fun checking out their fabulous cards and projects as well as Ildico and The Stamping Boutique DT projects.
Although I am not part of the blog hop this time when I saw the Candle and Ornament stamp from Sunshine’s Christmas stamps I just had to put together a project to show you.
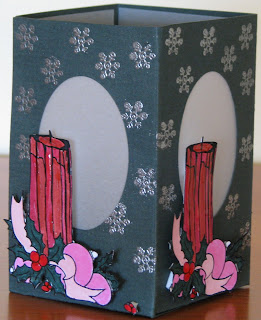
This is what I came up with. It is a luminary and I found the project here at SplitCoast Stampers. It is really easy to make and how good does it look! Well I like it anyway, hope you do too!
I have taken photos of the luminary both with the candle lit and not lit so that you can see what it looks like.
Luminary without lit candle:

 Luminary in the dark with votive candle lit:
Luminary in daylight with the votive candle lit:
This is what I used.
Sunshine’s Digital Stamps: Candle and Ornament
Stampin Up’s snowflake stamp from the short and sweet set.
Card Stock: The Green was given to me so not sure what brand it is. The Candle and Ornament I printed out onto Whisper White Card from Stampin’ Up.
The cut out windows are backed with vellum.
Inks: Stampin’ Up Ruby Red, Real Red, Pixie Pink, Rose Red, Handsome Hunter, Pretty in Pink, Going Grey and Basic Black.
I also used versamark to emboss the silver snowflakes in the base card. I should have used my embossing buddy but completely forgot so I had to get out the paint brush to brush off excess silver embossing powder (also Stampin’Up). I suggest you use an embossing buddy so the embossing powder sticks to just what you want it to and nothing else.
I also used my heat gun for the embossing
I used Stampin’ Up’s Crystal effects on the candle to make it look like the wax was running and on the berries on the holly to make them stand out a bit more.
To Cut out the windows in the box I used the cuttings system from Creative Memories.
I used my personal trimmer, scissors and scoring tool, super strong tape to keep the box together and also dimensionals to pop the Candle out from the box as I didn’t think it looked quite right flush to the box.
Thanks for stopping by and don’t forget to jump over to the blog hop it will be lots of fun.

Click on the Banner and you will jump right to Sunshine's Blog for the details or put these addresses into your address bar to jump to each of the three companies blogs to start your blog hop. Enjoy!!!
Sunshine's Stamps:
http://sunshinesstamps.blogspot.com/
http://sunshinesstamps.blogspot.com/
The Stamping Boutique: http://thestampingboutique.com/
Don't forget there are 12 Copic Markers up for grabs as the prize of this blog hop! How good is That!
Take Care


.jpg)
.jpg)

.jpg)
6 comments:
This is terrific!
OMG! This is absolutely fabulous and gorgeous! What an awesome idea! Just love it!
Oh sooooo pretty!! TFS!
This project is perfection! I love, love, love it!! great job on colouring the image and for making a 3D project that is sure to be a delightful Christmas accent to keep or gift! Great job Sharon! I just adore this! :) Go on over to Stuffies blog and check out a similiar project she did with equally stunning results. You gals rock! :)
This is just beautiful!!!
Very cool project!! I love how you took pictures with and without the candle burning inside.
Post a Comment