Welcome to my happy place.

Hi,

Welcome to my blog. Thank you so much for stopping by. I hope that you will find some inspiration for your projects as I have from many lovely people. This is just a little space for me to share some of my cards, scrap book pages and maybe even some of my embroidery and quilting projects.

Enjoy and stop back often.

Sharon


Tuesday, 27 November 2018

Stampin' Up - Colour Creations Blog Hop - Lovely Lipstick

Darling Label Punch Box, Lovely Lipstick, Thank You Card, Rhapsody in Craft, DIY cards, AWH Colour Creations Blog Hop


Tonight the wonderful team at Art with Heart are featuring one of the 2018-2020 In Colours and  it is a vibrant Pink called Lovely Lipstick.


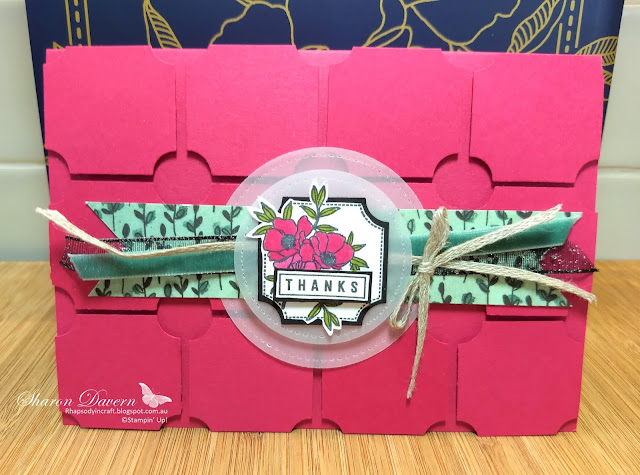
For my card tonight I saw the idea to cut/punch out using the punch from the  Darling Label Punch Box and make a background on line, and I think it was Kylie Bertucci, so I  put it away in my memory and brought it out for this card. I decided that just having the sentiment on its own on top of the gorgeous Share what you love DSP  from the Annual catalogue and Tranquil tide velvet ribbon, Braided Linen trim and black glittered organdy ribbon from the Holiday catalogue made the sentiment look a little small so I backed it in a black punched out label and also cut out 2 vellum stitched shaped circles to make the  sentiment stand out.

Darling Label Punch, Lovely Lipstick, Rhapsody in craft, Thank you cards, AWH colour creations

As you can see I have also coloured the flowers using the Lovely Lipstick Stampin' Blends. I stamped and extra sentiment and cut out the thanks and mounted that on black and placed it on 2 mini dimensionals. All the Lovely Lipstick background pieces are also mounted on dimensionals. On a normal card base they fit 4 across but I had to slightly trim the edge of the top and bottom ones to have a slight gap for all 3 to fit on evenly.

Darling Label Punch, Lovely Lipstick, Rhapsody in craft, Thank you Cards, DIY Cards, AWH Colour creations

I quite like how this Darling Label Punch background came out, I will have to try it with other punches. What punches do you think you might try?

The lovely Cathy is the host of our weekly Colour Creations Blog Hop please hop on over to her blog to see her creations and a list of the creative ladies participating tonight.

If you have any questions about tonight's card or would like to purchase these items to make the card yourself or join my team please don't hesitate to contact me.


Thank you for spending some time with me, happy crafting, take care

Thursday, 22 November 2018

Stampin' Up - Art With Heart Team Blog Hop November 2018 - Sketch Challenge


illuminated Christmas, His Light, Subtle TIEF, Christmas Card, Rhapsody in craft, Art with Heart, DIY Cards


Well this is the last Art With Heart team monthly blog hop for this year however the weekly colour creation hops are on going through out the year so there is still plenty of inspiration from the team.

Tonight the Art with Heart team are sharing creative projects featuring a card sketch. We hope you like how we have each put our own spin on the sketch and that it inspires you to get creative and make some fabulous cards. If you are inspired by the sketch, please share with us!


I have been quite literal in my interpretation of the sketch tonight and made a Christmas card with it!

Illuminated Christmas, His Light, Subtle TIEF, Rhapsody in craft, Christmas Cards, DIY Card, AWH Blog Hop,

I have used the Illuminated Christmas and His Light stamp sets for this card. The Subtle TIEF was used on champagne foil paper. I do have a love of copper foil but I thought I would use the champagne foil today and it looks so gorgeous embossed in the subtles folder. I have to thank Kate Morgan for that lovely idea as she used it a few weeks ago in one of her blog posts.

I have heat embossed the star in copper on very vanilla and then highlighted with daffodil delight ink using a sponge dauber. The gorgeous DSP is from the Joyous Noel Specialty pack and the little bow is made with a combination of the cherry cobbler and very vanilla festive farmhouse cotton twine.

The sentiment is from the His Light stamp set and I have cut it out using one of the thinlits from Petals and More thinlits pack. The rhinestones on either end are the clear ones but I have used my dark cherry cobber Stampin' Blends to colour them.

Now it is time to hop over to my the lovely and talented friend Monika, I always look forward to seeing what she has created for our blog hops.

If you find a broken link or have come to this blog from a different entry point, you can view the participants below:
Rebecca Jacovou
Caroline Manwaring
Sharon Davern <=You are here
Monika O’Neill
Sue Madex
Ros Davidson
Kate Morgan
Andrea Roberts
Tina Gillespie
Rachel Woollard 


If you would like anymore information about this card or would like a catalogue please don't hesitate to contact me:


Thank you for spending some time with me today, take care:

Wednesday, 21 November 2018

Stampin' Up - Heart of Christmas - Week 15

Flourish Filigree, Rhapsody in craft, Christmas cards, DIY cards, Heart of Christmas


This is the last week of the Heart of Christmas which is quite sad but that means Christmas is getting closer and I love Christmas.

Tonight I have cased the holiday catalogue for you. To Case means to copy and share everything. The Catalogues have cards and projects in them that are ideas for you to try.  The catalogues are a great source of inspiration.

I have done 3 versions of the card for you tonight. I have done a very easy version for you. So if you have just the stamp set, Flourish Filigree, card stock and an ink pad.
Flourish Filigree, Rhapsody in craft, Christmas cards, DIY cards, Heart of Christmas

The background stamp has been stamped in the same colour as the card stock, merry merlot.

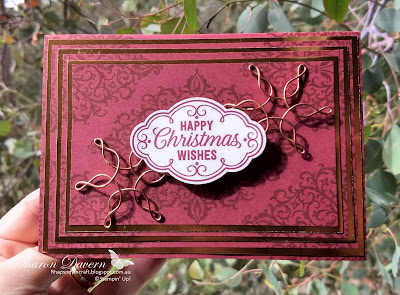
This next version is the one on page 40 of the catalogue and is for the stamper who has purchased a punch and the snowflake and star wire copper elements that have been attached under the sentiment with a glue dot. It is also a very easy version but  a little step up. Punches are a great investment.

Flourish Filigree, Rhapsody in craft, Christmas card, DIY Card, Heart of Christmas

For the 3rd card tonight I have done a major step up. I have gone a little crazy with my copper foil paper. I love it I will not deny it! I might need a little help.

Flourish Filigree, Rhapsody in craft, Heart of Christmas, Christmas card, DIY cards

To make this card I first cut all the layers of the merry merlot card stock. I had a normal card base and then layered the different sizes of merry merlot onto the base with a little adhesive so that they didn't move and then stamped the filigree image.

As you can see there is a little bit of the stamped image on all the layers. I pulled them all apart and layered the copper foil and put them all back together. I punched the sentiment out again using the pretty label punch and adhered the snowflakes with glue dots.

Don't forget to decorate the inside of your card as well. I have just stamped a corner of the whisper white insert with the same filigree stamp that I have used for the background stamp.


Please make sure you hop on over to our lovely host Claire Daly for more Christmas inspiration and a list of those hopping along tonight.

If you would like some more information about how to make these cards or would like to purchase the items to make them please do not hesitate to contact me

Thank you for spending some time with me today, take care


Tuesday, 20 November 2018

Stampin' Up - Colour Creations Blog Hop - Lemon-Lime Twist


So Santa, Festive Farmhouse, Rhapsody In Craft, Lemon-lime Twist, AWH Colour Creations Blog Hop, Christmas Cards, DIY Cards, Christmas


Welcome to week 25 of the colour creation blog hop. There are so many gorgeous colours in the Stampin' Up range and this week we are concentrating on Lemon-Lime Twist!

It is a vibrant colour and when I was thinking of what stamp set to work with in highlighting this colour all I could think of was our favourite crazy holidaying Santa from the So Santa stamp set.

Lemon-Lime Twist reminds me of summer and So Santa has gone on a surfing holiday to Australia again, I think he has taken a permanent holiday and the elves must be going frantic by now!

My First card I did with a white card base so you could see what it looks like if you had a pack of Thick Whisper White card stock to use as your card bases.
So Santa, Festive Farmhouse DSP, Lemon-Lime Twist, Rhapsody in craft, AWH Colour Creations Blog Hop, Art with Heart, Christmas card, Christmas, DIY Cards

For as simple and easy version you could use the curls and swirls texture impression embossing folder as I have here or leave it plain. I have cut a smaller piece of the Festive Farmhouse DSP. Don't you just love the plaid?  To add a little more dimension I have added a little copper foil behind the DSP but you could leave that out too! Santa is cut out using the Stitched shape framelits and offset him on a circle of Lemon-Lime Twist cut out using the layering circle framelits. I coloured using  the Stampin' Blends. I think I used 11 different colours for Santa. Isn't he just so cute? To top it all off I uses some gorgeous burlap ribbon and the cherry cobbler twine from the festive farmhouse twine collection.

Now as the Festive Farmhouse DSP was cherry cobbler I then made a cherry cobbler based card exactly the same as the white based card so you could see the difference between the 2.
So Santa, Festive Farmhouse DSP, Lemon-Lime Twist, Rhapsody in craft, Christmas Cards, Christmas, DIY cards, AWH Colour Creations Blog Hop

Very cool in either colour is So Santa.

Now because you have a Cherry Cobbler base and not the Thick Whisper White you need to have a white insert for your card so that you have somewhere to write. I have decorated the insert with a little bit of the Festive Farmhouse DSP. You could also do the same on the white card base.
So Santa, Festive Farmhouse, Lemon-Lime Twist, Rhapsody in craft, Christmas cards, Christmas, AWH Colour Creations Blog Hop, DIY Cards
I had fun with So Santa and Lemon-Lime Twist and it is a perfect colour for Christmas cards here in Australia, I hope you have a try at making your own cards.

Please make sure you go over to the lovely Cathy's Blog as she hosts our colour creations hops each week and there you will find the list of who has created with Lemon-Lime Twist this week.


If you have any questions about how to make these card or would like some goodies for your crafting fun please don't hesitate to contact me.


Thank you for spending some time with me today, take care


Wednesday, 14 November 2018

Stampin' Up - Heart of Christmas - Week 14


Well I can't believe how close it is to ..... well you know, my wedding anniversary! LOL! No My Birthday! Ok I'm not telling you how many days or weeks it is to Christmas but as my wedding anniversary is 3 days after Christmas and my birthday is 4 days after Christmas it is 6 weeks and 2 days until my wedding anniversary. Very exciting I know, this year will be 27 years married! I think we are doing not too bad for young people 😃😃

Tonight the Heart of Christmas blog hop is being hosted by my lovely friend and super creative Kate Morgan so make sure you go over to her blog to see what she has created and see the list of participants for tonight's hop.

Tonight I have for you a card made from the first frost bundle on page 37 of your holiday catalogue. It is so gorgeous! Here is my card.
First Frost, Tin Tile DTIEF, Tufted TIEF, Heart of Christmas, Christmas Card, Rhapsody in craft, Art with heart

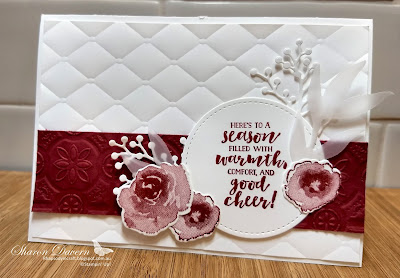
 I saw this design for a birthday card on Melissa Giffords blog and I  thought I would totally CASE it  and make a Christmas card with this design.


Here is a closer look at the  details especially at the tin tile band in cherry cobbler underneath the gorgeous flowers that have been stamped in cherry cobbler also.  I have cut the leaves out in vellum and the branches in whisper white card. The sentiment that comes with the gorgeous stamp set was cut out using the stitched shape framelits.

First Frost, Tin Tile DTIEF, Tufted DTIEF, Christmas Card, Rhapsody in craft, DIY Cards, Art with Heart, Heart of Christmas

This card is so easy to replicate and would look fantastic in whatever colour you chose. I only had a chance to make one today, bit of a busy day with appointments but I think I will be revisiting it to make some more in other colours. What colours do you think you would like to make?

Please don't hesitate to contact me if you have any questions about the card for tonight, you would like to purchase some of the goodies to make the cards or if you would like to join my team.

Thank you for spending some of your time with me today
Take Care

Wednesday, 7 November 2018

Stampin' Up - Hear of Christmas - Week 13


Tonight for week 13 I have used a card sketch for my inspiration. The reason I have done this is because in a couple of weeks the monthly team blog hop is a sketch challenge and it is a tricky one so I thought I would google a sketch and give it a try. Here is the sketch I chose.
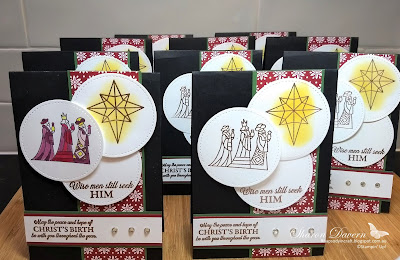
I didn't think it was too bad and set about to try and make a Christmas card that I could replicate numerous times for my church group as it is our final get monthly get together for the year this week and I always like to give them a Christmas card and a little treat. This is how it turned out.
Illuminated Christmas, Sketch challenge, Heart of Christmas, Rhapsody in craft, Christmas card

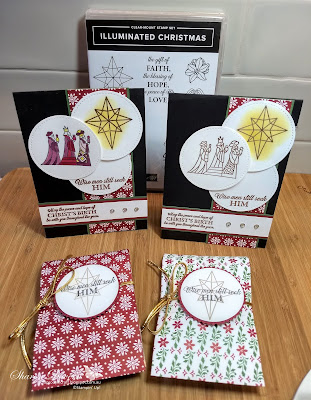
The card on the left is the original card that I made and I used my stampin' blends to colour in the 3 wise men. I embossed the star and sentiments in copper and used daffodil delight to make the star shine.
I thought to make 20 of these cards and to colour them in by Thursday night I might not make it so I the made the card on the right with the wise men embossed in copper.
To make multiple cards I cut everything out first then stamped and heat embossed then put everything together.
Lining everything up on the Stamparatus is the way to go. It is the perfect tool for this job that is for sure.
Illuminated Christmas, Christmas cards, rhapsody in craft, heart of Christmas
I ran out of room on my board for all 20 but they look good together.

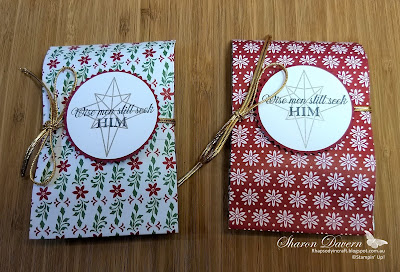
Illuminated Christmas, Christmas treat bags, heart of Christmas, Rhapsody in craft

The little treats are perfect in the little 3x6" gusseted cellophane bags.

To make these treats I have cut the bags down to 4 1/2 inches and then on both sides of the bag put on some tear and tape. 
Using a 12x3 inch piece of  DSP  making sure you have the opeing of the bag at the end of the DSP and then adhere the bag to the DSP.
I then used a 1x3 inch piece of DSP and wrapped it around the  chocolates and added them to the bag.
I Used the gold cord to tie the bag shut and the decorated the top with the star and sentiment and cut them out with the 2" circle punch and the starbust punch.

Illuminated Christmas, Christmas cards, Rhapsody in craft, dashing along, Heart of Christmas

Now to finish making all 20 treat bags for tomorrow night.

I almost forgot to tell you the DSP that I used tonight is the Dashing along DSP and it was a special free gift in September if your party reached or your own purchases reached $250. Well Stampin' Up are bringing it back as there have been some popular items that are nearly sold out of the holiday catalogue so if you would like this gorgeous DSP and weren't able to get it before you can now purchase it for just $19.25

Thanks for spending some time with me now pop on over to Claire's Blog to see who is hopping along tonight.

If you would like some more information do not hesitate to contact me.


Take Care


Wednesday, 31 October 2018

Stampin' Up - Heart of Christmas - Week 12


Tonight is week 12 of the Heart of Christmas and I have added a little twist to the top corner of my card tonight.

I was looking around for some different layouts and sketches that I might be able to use but then I saw this little twist that I hadn't come across before so I thought I would use it for my Christmas card this week.
Beautiful Baubles, Under the mistletoe, Stampin' Up, Art with heart, Christmas Cards, DIY Cards, Fancy Fold, Heart of Christmas, Rhapsody in craft

As you can see it has a little bit of a fancy twisted corner. I had not seen this twist before but it is kind of cool and it is so easy to do. Check out the end of my post for the photo tutorial!

Beautiful Baubles, Under the mistletoe, Stampin' Up, Christmas Card, Heart of Christmas, Art with Heart, Rhapsody in craft
Here is the corner without anything behind it. Rather a bit fancy.
For the Bauble I have stamped it in memento ink and used my Stampin' Blends to colour it in matching the colours from the Under the Mistletoe DSP that I have used on the card, which is in the Annual Catalogue! I then decided they were a little bit bold so I muted it slightly with the Frost White Shimmer Paint which I applied using a sponge dauber. I cut the bauble out with the stitched shape framelits and popped it up on some dimensionals and added the shimmery black organza ribbon. It has become one of my favourite ribbons from the holiday catalogue!

Beautiful Baubles, Christmas Cards, Heart of Christmas, Rhapsody in Craft,

I have layered the inside of the card and stamped this beautiful saying. When you close the card the layers look fantastic in the top corner.
Beautiful Baubles, DIY Cards, Christmas Cards, Rhapsody in Craft, Art with Heart, Heart of Christmas, Stampin' Up,

Hope you have enjoyed this weeks Heart of Christmas card. Make sure you pop on over to my lovely friend Claire Daly's blog and see who else is hopping along with some Christmas inspiration.

Please don't hesitate to contact me if you need any craft supplies of would like help in making this card.

Now for a look at how to make the corner of your card.
I actually folded my card base in half just so I could get my head in the correct spot where the twist needed to be. I have photographed in Night of Navy so you can see the contrast.
This is the top corner that you will need to cut. The whisper white square is the size of the square that that needs to be cut. It is 7.5 cm square. I cut it as a guide so you could see what I was doing.

It this first cut I turned the over so that the middle fold of the card base is to your right hand side and the edge of your card is lined up with 7.5 on your trimmer.


Now move your blade to the 1 cm mark DO NOT CUT DOWN TO THE MARK just move to that spot. You will start cutting from this spot.

Now cut down to the 7.5 cm mark

 Now flip your card back over so that it looks like this with the cut mark at the bottom and the fold line still on the right hand side and line the edge of your card up at the 7.5 cm mark on your trimmer.
Now repeat the steps that we did before.


Move your blade down to 1 cm mark. DO NOT CUT. We will start cutting from here.

Cut down to the 7.5 cm mark.


Now your card should look like this with the cuts joining up.

Fold your card base back over so that the cut is in the tip right hand corner of your card.

Now swing the cut card through the hole that you have created and then use your bone folder to burnish the 2 little corners


After you have decorated your card front to your liking adhere down the part of the card base that you have swung through so that it stays down and you can decorate it in anyway you like.

There you go. Let me know if you need help with these instructions. Let me know if you try to make this card yourself. I would love to see what you have made.

Thank you for spending some time with me tonight.
Take Care,

Colour Creations Blog Hop - Week 34 - 2024 -2025 - Melon Mambo - Spotlight on Nature Birthday

  Welcome to week 34 and Melon Mambo Week!  Can you believe that we are one week before Christmas? I can't but I love Christmas as it is...