Welcome to my happy place.

Hi,

Welcome to my blog. Thank you so much for stopping by. I hope that you will find some inspiration for your projects as I have from many lovely people. This is just a little space for me to share some of my cards, scrap book pages and maybe even some of my embroidery and quilting projects.

Enjoy and stop back often.

Sharon


Wednesday, 31 October 2018

Stampin' Up - Heart of Christmas - Week 12


Tonight is week 12 of the Heart of Christmas and I have added a little twist to the top corner of my card tonight.

I was looking around for some different layouts and sketches that I might be able to use but then I saw this little twist that I hadn't come across before so I thought I would use it for my Christmas card this week.
Beautiful Baubles, Under the mistletoe, Stampin' Up, Art with heart, Christmas Cards, DIY Cards, Fancy Fold, Heart of Christmas, Rhapsody in craft

As you can see it has a little bit of a fancy twisted corner. I had not seen this twist before but it is kind of cool and it is so easy to do. Check out the end of my post for the photo tutorial!

Beautiful Baubles, Under the mistletoe, Stampin' Up, Christmas Card, Heart of Christmas, Art with Heart, Rhapsody in craft
Here is the corner without anything behind it. Rather a bit fancy.
For the Bauble I have stamped it in memento ink and used my Stampin' Blends to colour it in matching the colours from the Under the Mistletoe DSP that I have used on the card, which is in the Annual Catalogue! I then decided they were a little bit bold so I muted it slightly with the Frost White Shimmer Paint which I applied using a sponge dauber. I cut the bauble out with the stitched shape framelits and popped it up on some dimensionals and added the shimmery black organza ribbon. It has become one of my favourite ribbons from the holiday catalogue!

Beautiful Baubles, Christmas Cards, Heart of Christmas, Rhapsody in Craft,

I have layered the inside of the card and stamped this beautiful saying. When you close the card the layers look fantastic in the top corner.
Beautiful Baubles, DIY Cards, Christmas Cards, Rhapsody in Craft, Art with Heart, Heart of Christmas, Stampin' Up,

Hope you have enjoyed this weeks Heart of Christmas card. Make sure you pop on over to my lovely friend Claire Daly's blog and see who else is hopping along with some Christmas inspiration.

Please don't hesitate to contact me if you need any craft supplies of would like help in making this card.

Now for a look at how to make the corner of your card.
I actually folded my card base in half just so I could get my head in the correct spot where the twist needed to be. I have photographed in Night of Navy so you can see the contrast.
This is the top corner that you will need to cut. The whisper white square is the size of the square that that needs to be cut. It is 7.5 cm square. I cut it as a guide so you could see what I was doing.

It this first cut I turned the over so that the middle fold of the card base is to your right hand side and the edge of your card is lined up with 7.5 on your trimmer.


Now move your blade to the 1 cm mark DO NOT CUT DOWN TO THE MARK just move to that spot. You will start cutting from this spot.

Now cut down to the 7.5 cm mark

 Now flip your card back over so that it looks like this with the cut mark at the bottom and the fold line still on the right hand side and line the edge of your card up at the 7.5 cm mark on your trimmer.
Now repeat the steps that we did before.


Move your blade down to 1 cm mark. DO NOT CUT. We will start cutting from here.

Cut down to the 7.5 cm mark.


Now your card should look like this with the cuts joining up.

Fold your card base back over so that the cut is in the tip right hand corner of your card.

Now swing the cut card through the hole that you have created and then use your bone folder to burnish the 2 little corners


After you have decorated your card front to your liking adhere down the part of the card base that you have swung through so that it stays down and you can decorate it in anyway you like.

There you go. Let me know if you need help with these instructions. Let me know if you try to make this card yourself. I would love to see what you have made.

Thank you for spending some time with me tonight.
Take Care,

Tuesday, 30 October 2018

Stampin' Up - Art With Heart Colour Creations Blog Hop Week 22 - Grapefruit Grove


I am having a lot of fun when I get the chance to hop along with the Art With Heart team and challenge myself with the next colour in the list of gorgeous colours that Stampin' Up has to offer. This week it is Grapefruit Grove and it is one of the new In Colours for 2018-2020.
It is a very vibrant and gorgeous colour and I think you are going to like it a lot.
I have done a very simple and quick card for you tonight. I know you had better sit down. It is not a fancy fold card. 
Grapefruit gorve, Petal Palette, Tufted DTIEF, Subtle DTIEF, Art With Heart Colour Creations Blog Hop, DIY Cards, Nature;s Poem DSP

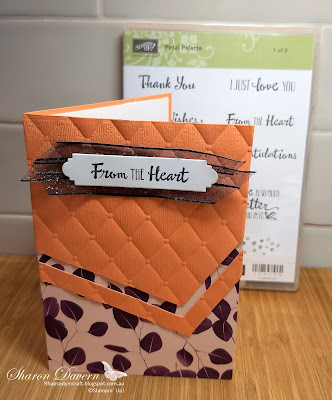
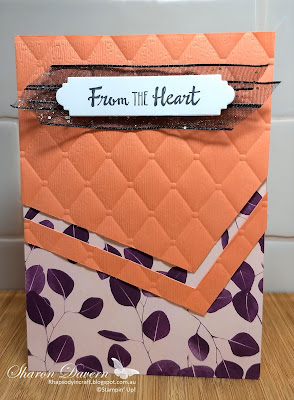
For this card I have embossed the Grapefruit Grove card stock twice. The first time through the big shot I embossed with the Subtle Dynamic Textured Impressions Embossing Folder ( DTIEF) and then I put it through the big shot a second time using the Tufted DTIEF.

Here is an up close look at the card stock so you can see both impressions.

It really looks gorgeous adding that extra bit of texture to the already beautiful Tufted DTIEF.

For the gorgeous Designer Series Paper I have used Nature's Poem I really love Blackberry bliss and the Petal Pink that is in this particular piece. Grapefruit Grove is one of the colours that is featured in the Nature's Poem DSP.

The Black Glittered Organdy Ribbon is just beautiful and is perfect to be the backdrop for the greeting that I have used from the stamp set Petal Palette and cut out using the Petals and More Thinlits that coordinate with this gorgeous stamp set. I popped it up on a few dimensionals.

Grapefruit Grove, Stampin' Up, Tufted DTIEF, Subtle DTIEF, Nature's Poem, Petal Palette, Art with heart colour creations blog hop, Art with heart, DIY cards

To get the design on the front of the card I have simply cut the embossed piece of grapefruit grove card stock on an angle and then the piece I had left I cut the little extra bit to add as well.

Make sure you hop on over to the lovely Cathy Proctor so that you can see more inspiration for the colour Grapefruit grove. 

Don't hesitate to contact me if you need any help in making this card or for any of your craft need.

Thank you for spending some time with me today.
Take Care
Sharon

Thursday, 25 October 2018

Stampin' Up - Art With Heart Team Blog Hop October 2018 - Theme - Colour Challenge - Pnik


Tonight the Art with Heart team are sharing creative projects featuring the colour pink. We hope our blog hop inspires you to get creative with the various shades of pink that Stampin’ Up! offer in our collection of 53 different colours available

I have created 4 cards for you tonight. I wanted to try a couple of techniques I hadn't done for a while and thought "thinking pink" would be a perfect time to try them out.

For my first card tonight I wanted to try the "spotlight technique".  It is where you basically high light a part of your card.
In Every Season, Love What You Do, Art With Heart Blog Hop, Rhapsody in craft, Pink, Thank you card, spotlight technique

I have used the rose from the In every season stamp set and stamped it in memento black ink cascading across the whisper white front of the card. I had already cut out the circle using the layering circle framelits and placed it temporarily on the card before stamping. 
In every season,love what you do,rhapsody in craft, spotlight technique, art with heart

Once stamped I coloured in the rose in pink using my Stampin' Blends ( Flirty Flamingo, and shaded spruce) and then popped it on a basic black circle. Simple yet elegant thank you card with the added polka dot tulle ribbon and silver and petal pink bakers twine to finish off. The Thanks you was from the Love what you do stamp set.

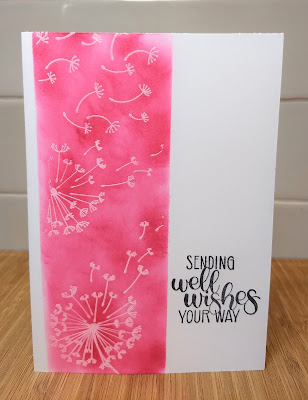
My next card I wanted to try another technique I hadn't done in a while and it is emboss resist.
Dandelion wishes, emboss resist, art with heart, rhapsody in craft

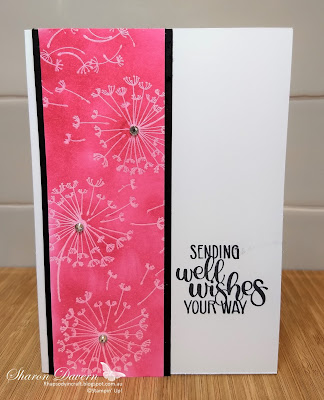
I have done this card 2 ways. A simple version and then a slightly stepped up version.
Dandelion wishes, emboss resist, pink, Art with heart, rhapsody in craft

In this first version I have used my Thick whisper white card stock as my base card and masked off a panel to make sure I only stamp and ink in between that area. I heat embossed in white the dandelions then with Melon Mambo and my sponge dauber I inked up the panel. I then rubbed off the ink from the white dandelions. Memento black ink for the get well message that come in this great stamp set called Dandelion wishes.

Dandelion wishes, pink, emboss resist, art with heart, rhapsody in craft
In this stepped up version I  cut a panel of thin whisper whit card stock and heat embossed in white the dandelions and repeated the same process as I had done for the previous card. This time I popped it on a basic black panel and added some basic rhinestones for some extra bling.

While I had the Melon Mambo out I had to make a pink card although I didn't ink in melon mambo.
Love what you do, pink, art with heart, rhapsody in craft

Again, I have used the thick whisper white card base, and layered basic black, melon mambo and garden impressions DSP. I am really loving the stampin' blends for all my colouring that I have been doing lately and I have used, pink pirouette dark and light and flirty flamingo for the flowers. After wrapping the polka dot tulle ribbon around the flower I popped the thank you up on a couple of dimensionals.

Hope you have enjoyed my pink cards tonight, now it is time to hop on over to our next participant, the very talented and my lovely friend Kate Morgan

If you find a broken link or have come to this blog hop from a different entry point, you can view the participants below:


Thank you for spending a bit of your time with me tonight, happy crafting.
Take care,

Wednesday, 24 October 2018

Stampin' Up - Heart of Christmas - Week 11


Tonight for the Heart of Christmas blog hop I have searched the internet high and low for a fancy fold just for you! I know I can't resist them and I had to find one that I had not done before which was hard to do and I found one! It was a video that was posted way back in 2010 by Sari Hanninen and she called it a Double Slider Card. I have used the So Santa stamp set for my card. It is becoming a favourite of mine I must admit.
So Santa, Christmas Cards, Heart of Christmas, Fancy Fold, double slider card, Art with heart, Rhapsody in craft

As you can see there are 2 little tabs giving you the hint of something hiding and that you need to pull on them to find out what is hiding inside. Don't you just love Santa on his scooter. He is kind of cute. I have stamped him here in memento ink on Whisper White Card stock, coloured him in with my Stampin' Blends, divine! Cut him out with the layering oval framelits, and adhered him to the front of the card on an offset Early Espresso oval. Poppy parade is the shade of red that is used in the Santa's Workshop specialty DSP so I have used that as my red for this card as well as using this gorgeous DSP.
So Santa, double slider Card, Christmas Cards, Heart of Christmas, Art with Heart, Rhapsody in Craft

The little tabs of Santa's Workshop DSP are punched out using our circle tab punch.

So Santa, fancy fold, double slider card, heart of Christmas, rhapsody in craft, Christmas Card,

Fancy fold, So Santa, double Slider Card, Rhapsody in craft, Heart of christmas, Christmas card, heart of Christmas

Ok as you can see it is quite an exciting fancy fold and I had trouble working out just how to photograph it so you could see it.

I am going to write a bit of a tutorial at the end of this post if you would like to see how this card is made, or if you would like to hop off now to the lovely Claire Daly who is hosting the Heart of Christmas blog hop and see the list of participants please come back and check out the tutorial later. It really isn't hard to do and if you have questions don't hesitate to contact me.


Ok now for the Tutorial of the double slider card. I have taken photos along the way so hopefully I have enough information for you to make this card.
  1. Cut a your base card 5 1/2 x 11 inches 14 cm x 28 cm
  2. Score at 3 1/2, 7 & 10 1/2 inches  8.9, 17.8, 26.7 cm
  3. cut a piece of plastic bag 2 1/2 inches by 12 inches 6.3 cm by 30.5 cm
  4. Adhere the plastic using tear and tape around one end/flap of the card, making sure it is tight but not so that it bends the card.
  5. Make sure the join is towards the bottom of the card
  6. Now to make the layers of the cards
    The layers are 3 1/4 x 5 1/2 inches Early Espresso or your base colour  7 cm x 14 cm.  Garden Green Layer is 2 5/8 x 5 /38 inches or 6.7 cm x 13.6 cm. Our So Santa layer is 2 /716 x 5/14 inches or 6.2 x 13.3 cm
  7. Adhere these layers together and then punch out your table in your choice of DSP. Put a tab at the TOP of one picture and at the BOTTOM of the other picture. THIS IS VERY IMPORTANT.
  8. Place a piece of tear and tap to the bottom of the plastic bag strip on the card.
  9. Now adhere your picture with the tab that is at the top to this piece of the plastic slider mechanism. Making sure that you center your image and that it lines up exactly with the bottom of the card.
  10. AS you can see the tab is at the top and the card is centered. You can fold the card base up at this time and make sure that the sliding mechanism works if you would like but it is not necessary. 
  11. Now for the tricky part. Fold in the layer that has the picture on it.
  12. As you can see the picture has now been folded in and the tab is still at the top to the right of the card and you can now see the rest of the plastic bag.
  13. Place some tear and tape on the plastic bag at the top right where you see the tab in the picture in #11.
  14. Now get your second So Santa picture and turn it face down with the tab to the left or the bottom of the card.

  15. Now it is time to close up the card by adding some tear and tape to the small flap and making sure that when you fold it over to adhere it to the Poppy Parade card base that you make sure that you slid it under picture 
  16. Now it should all slide perfectly for you.
  17. Time to decorate the front the way you see fit. I  cut a piece of DSP  3 7/8 inches x 5 3/8 inches 8.6 cm x 13.6 cm before adding my cut out So Santa design on the front.
  18. For the back of the card I cut a layer of 3 3/8 inches x 5 3/8 inches 8.6 x 13.6 cm and then the Whisper White is 3 1/4 x 5 1/8 or 8.2 x13.3 cm before I stamped the greeting from the So Santa stamp set and a few star fish and coloured them in with the stampin' Blends.

Hope you have a lovely day and thank you so much for spending some time with me. 
Take Care

Colour Creations Blog Hop - 2024-2025 - Week 36 - Moody Mauve - Cutest Onsie Baby Pop Up Card

  Welcome to week 36 of our Colour Creations Blog hop.  I have been making a series of Baby Cards using the Cutest Onsies Bundle and I made ...