Welcome to my happy place.

Hi,

Welcome to my blog. Thank you so much for stopping by. I hope that you will find some inspiration for your projects as I have from many lovely people. This is just a little space for me to share some of my cards, scrap book pages and maybe even some of my embroidery and quilting projects.

Enjoy and stop back often.

Sharon


Wednesday 30 August 2023

Colour Creations Blog Hop - Week 18 - Coastal Cabana


Rhapsodyincraft, Rhapsody in craft, #rhapsodyincraft,Coastal Cabana, Fancy Fold, Bendy Bendy Window Card, Birthday Card, Seasonal Branches, Dies, Seasonal Branches, Inked Botanicals, Deckled Circle Dies, #colourcreationsblog hop, Stampin' Up, #loveitchopit, Art With Heart, #artwithheart


Welcome to the Coastal Cabana Colour Creations Blog Hop for 2023. 


Today I am will be bringing you a birthday card as a request from my daughter. She did not request a fancy fold but I had to do this fancy fold when I saw it on Frenchies Stamps Blog, A Canadian Stampin' Up demonstrator!

Frenchie called her card a Bendy Window card, I will call mine a Bendy, Bendy Window card. She got the inspiration from another demonstrator so live on the Bendy, Bendy Window cards!

Rhapsodyincraft, Rhapsody in craft, #rhapsodyincraft,Coastal Cabana, Fancy Fold, Bendy Bendy Window Card, Birthday Card, Seasonal Branches, Dies, Seasonal Branches, Inked Botanicals, Deckled Circle Dies, #colourcreationsblog hop, Stampin' Up, #loveitchopit, Art With Heart, #artwithheart

So let me do a quick talk through of the card. The basics of the card is 4 card fronts folded in half and then stuck together after decorating! Then add a window sheet on the front! Sound simple doesn't it!
Here is the colour combination that I used. I have added the gorgeous Inked Botanicals colours to this palette that are in this particular sheet of DSP that I used along with the added Soft Sea Foam and our in the spot light colour Coastal Cabana so that you could see them all together!
Rhapsodyincraft, Rhapsody in craft, #rhapsodyincraft,Coastal Cabana, Fancy Fold, Bendy Bendy Window Card, Birthday Card, Seasonal Branches, Dies, Seasonal Branches, Inked Botanicals, Deckled Circle Dies, #colourcreationsblog hop, Stampin' Up, #loveitchopit, Art With Heart, #artwithheart
So this is the front of the front of the card without the window sheet. For this I have cut a card base of Coastal Cabana of 14.9 cm x 10.5 cm and folded it in half then layered the gorgeous Inked Botanicals DSP on that. The Curved front section was created by making a layer of Coastal Cabana smaller than card front by 1 cm border all round and then adding a cm on each edge to fold under to adhere to the front of the card. I then used my bone folder to help give the card a bend. Once I had stamped the sentiment I knew which one of the Deckled Circle Dies I could use to cut out the sentiment and also the section in the front and then in the DSP before adhering it all together.
Rhapsodyincraft, Rhapsody in craft, #rhapsodyincraft,Coastal Cabana, Fancy Fold, Bendy Bendy Window Card, Birthday Card, Seasonal Branches, Dies, Seasonal Branches, Inked Botanicals, Deckled Circle Dies, #colourcreationsblog hop, Stampin' Up, #loveitchopit, Art With Heart, #artwithheart


Under the sentiment I have also popped a little bridge for it to sit on so that it pops out when open. I then stamped the stem in Lost Lagoon, the leaves in Soft Sea Foam and the Flowers in Coastal Cabana and added a little bit more Coastal Cabana and Crushed Curry with my blender pen to the flowers before cutting them out with the Seasonal Dies. I added all of these with Mini Glue dots so they can move flexibly. Can you see that I have added the window sheet in this photo. It needs to be the same height as the card front but for the width leave an extra 2 mm on each side when you fold over the 1 cm extra to wrap over the front just to give yourself some space for the front decorations. You want your card flat!
Rhapsodyincraft, Rhapsody in craft, #rhapsodyincraft,Coastal Cabana, Fancy Fold, Bendy Bendy Window Card, Birthday Card, Seasonal Branches, Dies, Seasonal Branches, Inked Botanicals, Deckled Circle Dies, #colourcreationsblog hop, Stampin' Up, #loveitchopit, Art With Heart, #artwithheart

For the back of the card so that you have somewhere to write your message to the recipient, you again cut a card front and fold in half layer with your Inked Botanicals DSP then stamp a little greeting from the Seasonal Branches Stamp set in Coastal Cabana, bend you card with the bone folder and when you adhere make sure the card is flat.
Rhapsodyincraft, Rhapsody in craft, #rhapsodyincraft,Coastal Cabana, Fancy Fold, Bendy Bendy Window Card, Birthday Card, Seasonal Branches, Dies, Seasonal Branches, Inked Botanicals, Deckled Circle Dies, #colourcreationsblog hop, Stampin' Up, #loveitchopit, Art With Heart, #artwithheart

To adhere your front to the back create the 2 more card fronts (now you have 4 ) fold them in half. Half adhered to the back and half to the front.
Rhapsodyincraft, Rhapsody in craft, #rhapsodyincraft,Coastal Cabana, Fancy Fold, Bendy Bendy Window Card, Birthday Card, Seasonal Branches, Dies, Seasonal Branches, Inked Botanicals, Deckled Circle Dies, #colourcreationsblog hop, Stampin' Up, #loveitchopit, Art With Heart, #artwithheart

Now you can see all the layers and the bends easily from the top of the card.

Rhapsodyincraft, Rhapsody in craft, #rhapsodyincraft,Coastal Cabana, Fancy Fold, Bendy Bendy Window Card, Birthday Card, Seasonal Branches, Dies, Seasonal Branches, Inked Botanicals, Deckled Circle Dies, #colourcreationsblog hop, Stampin' Up, #loveitchopit, Art With Heart, #artwithheart

And yes it does fold flat and go into our envelopes!

Here is a little video


I am sure you are thinking "Sharon you said 4 card fronts, easy!" Well it is 4 card fronts all glued together the hardest part was working it all out with a migraine today and my son kept messaging me at the same time! Seriously they know it is Colour Creations Day! LOL!

I hope you enjoy this fancy fold and can understand a little of my ramblings if not please do contact me and I will be so happy to get back to you!

Now is the time to head to the next very talented team member and this week you will be heading to our lovely host Cathy Proctor. So hit the next blog button and you will go straight there.

If for any reason while you are on your journey around and one of the links don't work just head to Cathy's blog and she will have a list of all those participating in the Coastal Cabana Colour Creations Blog Hop: Cathy's Blog.

Thank you for spending some crafty time with me today, take care,


Monday 28 August 2023

Heart Of Christmas - Week 4 - 2023 - Fan Fold Card


Rhapsody in Craft,#rhapsodyincraft,#heartofchristmas,#heartofchristmas2023,Joy of Christmas suite, Joy of Noel Bundle, Joy of Noel, Joy of Noel Die, Christmas Classics Bundle, Christmas Classics, Christmas Classics dies, Joy of Christmas DSP, Loose Holly Gems and Sequins, Fun Fold, Fancy Fold Fan Fold, Christmas card, Stampin' Up, #loveitchopit, Art with Heart,#artwithheart

Welcome to week 4 of the Heart of Christmas for 2023. This week I am doing a fun fold and it is called a Fan Fold Card. I came across this card when looking for different fun and fancy folds to do. Lisa Curcio a demonstrator in the US had this Fan Fold on her blog so I thought I would give it a go.
Rhapsody in Craft,#rhapsodyincraft,#heartofchristmas,#heartofchristmas2023,Joy of Christmas suite, Joy of Noel Bundle, Joy of Noel, Joy of Noel Die, Christmas Classics Bundle, Christmas Classics, Christmas Classics dies, Joy of Christmas DSP, Loose Holly Gems and Sequins, Fun Fold, Fancy Fold Fan Fold, Christmas card, Stampin' Up, #loveitchopit, Art with Heart,#artwithheart

I have used the Christmas Classics Bundle and the Joy of Noel Bundle that are all part of the Joy of Christmas suite on pages 28 and 29 of the New September - December Mini.

For the card base I have taken a piece of Shaded Spruce 21x21 cm or 8 1/4 x 8 1/4 inches 
I have taken my colour scheme from the Joy of Christmas DSP.  My card base is first scored at 10.5 cm or 4 1/8 inches then turned and scored again so that you now have 4 quarters. Then you place the 2 points of your card in the score/cut track of your paper trimmer and score on the diagonal and do that both way so that you end up with 8 triangles. Turn and place your card base back in your trimmer lining it up with flat along the top and at 10.5 or 4 1/8 inches and cut up to the half way score line being careful not to go over.
Fold your card base in a fan style with a mountain fold first, making sure not to fold the last one but to leave that flat for the base of the card. Now it is time to decorate!
Rhapsody in Craft,#rhapsodyincraft,#heartofchristmas,#heartofchristmas2023,Joy of Christmas suite, Joy of Noel Bundle, Joy of Noel, Joy of Noel Die, Christmas Classics Bundle, Christmas Classics, Christmas Classics dies, Joy of Christmas DSP, Loose Holly Gems and Sequins, Fun Fold, Fancy Fold Fan Fold, Christmas card, Stampin' Up, #loveitchopit, Art with Heart,#artwithheart

For the decorations of my card I have taken a layer of Basic white and layered it with the Pecan Pie coloured piece of music DSP from the Joy of Christmas DSP and then with the Christmas Classic Dies I cut out the frame in Old olive and the branches in Pecan Pie and Crumb Cake and the leaf is the reverse side to the Cherry Cobbler piece of DSP which is die cut out with the Christmas Classic Dies as well and is under the NOEL which I have die cut out in Gold Foil from the Joy of Noel Dies. Joyous is stamped in Basic gray and fussy cut and you can not Loose Holly gems for some bling.
Rhapsody in Craft,#rhapsodyincraft,#heartofchristmas,#heartofchristmas2023,Joy of Christmas suite, Joy of Noel Bundle, Joy of Noel, Joy of Noel Die, Christmas Classics Bundle, Christmas Classics, Christmas Classics dies, Joy of Christmas DSP, Loose Holly Gems and Sequins, Fun Fold, Fancy Fold Fan Fold, Christmas card, Stampin' Up, #loveitchopit, Art with Heart,#artwithheart

Lift one layer of the fan and I have your next sentiment from the Christmas Classics.
Rhapsody in Craft,#rhapsodyincraft,#heartofchristmas,#heartofchristmas2023,Joy of Christmas suite, Joy of Noel Bundle, Joy of Noel, Joy of Noel Die, Christmas Classics Bundle, Christmas Classics, Christmas Classics dies, Joy of Christmas DSP, Loose Holly Gems and Sequins, Fun Fold, Fancy Fold Fan Fold, Christmas card, Stampin' Up, #loveitchopit, Art with Heart,#artwithheart
Lift the next fan to reveal the next sentiment.
Rhapsody in Craft,#rhapsodyincraft,#heartofchristmas,#heartofchristmas2023,Joy of Christmas suite, Joy of Noel Bundle, Joy of Noel, Joy of Noel Die, Christmas Classics Bundle, Christmas Classics, Christmas Classics dies, Joy of Christmas DSP, Loose Holly Gems and Sequins, Fun Fold, Fancy Fold Fan Fold, Christmas card, Stampin' Up, #loveitchopit, Art with Heart,#artwithheart
Unfurl the complete card and the base you can write your message to the recipient.

Here is a little video of opening and closing the card.

So much fun and easy to make I hope you enjoyed this fun/fancy fold. If you have any questions please contact me.


Now is the time to head  to the next wonderful talented Art With Heart Team member sharing some Christmas inspiration today. Just hit the next blog button and you will be take straight to Michele Taylor, I can't wait to see what she has for us this week.
If for some reason one of the links send you somewhere you don't want to go please head back here and continue your Christmas inspiration journey from the list below of the Art With Heart Team participating this week. Happy hopping.

Thank you for spending some Christmas crafty time with me today, take care,


Wednesday 23 August 2023

Colour Creations Blog Hop - Week 17 - 2023-2024 - Cherry Cobbler - Collapsible Pillar Card


Rhapsody in craft,#rhapsodyincraft, #colourcreationsbloghop,Cherry Cobbleer, Fun Fold, Fancy Fold, Collapsible Pillar Card, Birthday Card, Delightfully Eclectic DSP, Bright and Beautiful DSP, Paper Florist Dies, Seasonal Branches Dies, Season Branches, #loveitchopit, Art with Heart, Stampin' Up


Welcome to Week 17 of the Colour Creations Blog Hop for 2023-24. Today we are looking at the gorgeous Cherry Cobbler. I really like this colour and use it as my go to colour for Christmas Cards but today I thought I would use it for a birthday card.
Rhapsody in craft,#rhapsodyincraft,#colourcreationsbloghop,Stampin' Up!

Last week I didn't do a fancy fold and I let Theresa Gerrard down so I thought I had better get my skates on and make a fancy fold this week. So I hunted high and low for a different card and found this one by Jamie Rodgers, it is called a Collapsible Pillar Card. Now there are a few different versions out there but I have made this one similar to his in the construction but definitely decorated differently!

For this card I have chosen to use lots of flowers in many colours including Cherry Cobbler and use Cherry Cobbler as the base of the card. Here is my colour combination and when I say lots of flowers I have chosen to channel Christine Blain with her more is better philosophy!

Rhapsodyincraft, Rhapsody in craft, #rhapsodyincraft, #colourcombinationbloghop,Stampin' Up! #stampinup, Art with heart

To start the construction of the card I made the pillars and before adhering them closed I added the gorgeous Delightfully Eclectic DSP to the inside of the pillar. Then add Bright and Beautiful DSP to the card Base before adhering the first 2 pillars.

Rhapsody in craft,#rhapsodyincraft, #colourcreationsbloghop,Cherry Cobbleer, Fun Fold, Fancy Fold, Collapsible Pillar Card, Birthday Card, Delightfully Eclectic DSP, Bright and Beautiful DSP, Paper Florist Dies, Seasonal Branches Dies, Season Branches, #loveitchopit, Art with Heart, Stampin' Up
Well then I went to town and took out all the card stock in these colours and Oh I forgot Crumb Cake too and the Paper Florist Dies and the twig branches in the crumb cake are from the Seasonal Branches dies.
Rhapsody in craft,#rhapsodyincraft, #colourcreationsbloghop,Cherry Cobbleer, Fun Fold, Fancy Fold, Collapsible Pillar Card, Birthday Card, Delightfully Eclectic DSP, Bright and Beautiful DSP, Paper Florist Dies, Seasonal Branches Dies, Season Branches, #loveitchopit, Art with Heart, Stampin' Up
Layer 1 complete and no comes the challenge of putting on the window sheet. So I thought I would try with the tear 'n' tape to make sure it was not going to fall apart. Well let's just say next time I make it the Liquid Multipurpose Glue will be used as all stages! It forgot to anticipate the need to make sure it would fold down flat so needing to move a little before drying. I mean I know it needed to fold down flat and I thought it would but it became a bit toooooo inflexible so it is not as flat as I would like. I will show you at the end!
Rhapsody in craft,#rhapsodyincraft, #colourcreationsbloghop,Cherry Cobbleer, Fun Fold, Fancy Fold, Collapsible Pillar Card, Birthday Card, Delightfully Eclectic DSP, Bright and Beautiful DSP, Paper Florist Dies, Seasonal Branches Dies, Season Branches, #loveitchopit, Art with Heart, Stampin' Up
So in between the pillars is the window sheet.
Rhapsody in craft,#rhapsodyincraft, #colourcreationsbloghop,Cherry Cobbleer, Fun Fold, Fancy Fold, Collapsible Pillar Card, Birthday Card, Delightfully Eclectic DSP, Bright and Beautiful DSP, Paper Florist Dies, Seasonal Branches Dies, Season Branches, #loveitchopit, Art with Heart, Stampin' Up
Next layer of flowers a little lower down and on the opposite side as I want the card to collapse one way on the lower level and the other way on the top level.
Rhapsody in craft,#rhapsodyincraft, #colourcreationsbloghop,Cherry Cobbleer, Fun Fold, Fancy Fold, Collapsible Pillar Card, Birthday Card, Delightfully Eclectic DSP, Bright and Beautiful DSP, Paper Florist Dies, Seasonal Branches Dies, Season Branches, #loveitchopit, Art with Heart, Stampin' Up
After adding the second window sheet with the liquid multipurpose glue and making sure it would lay flat, for Christine I have added more gorgeous Delightfully Eclectic DSP and lots and lots of flowers before adding a little Happy Birthday sentiment stamped in Cherry Cobbler from the Seasonal Branches stamp set.
Rhapsody in craft,#rhapsodyincraft, #colourcreationsbloghop,Cherry Cobbleer, Fun Fold, Fancy Fold, Collapsible Pillar Card, Birthday Card, Delightfully Eclectic DSP, Bright and Beautiful DSP, Paper Florist Dies, Seasonal Branches Dies, Season Branches, #loveitchopit, Art with Heart, Stampin' Up!

Here is the card all collapsed down and if you look at the DSP in the Pillars you can see that the back pillars collapse to the left and the front pillars collapse to the right. This means you can make and envelope for your card to go in especially if you get it to sit flat like the front pillars are. This time I will make a box to put the card in which will be beautiful as well.

I hope you have enjoyed my first attempt at a Collapsible Pillar Card and don't forget you can add a panel of basic white card on the back to write your message to your friend who is getting the birthday card.

If you have any questions about my project this week please contact me.

Now is the time to head to the next person on our journey of Cherry Cobbler, and this week you will be heading to our lovely host Cathy Proctor, I can't wait to see what she has for us this week, she is very talented and I just love seeing her gorgeous creations, so just hit the next blog button and you will be take straight there. 

If for any reason the next blog buttons don't go where they are supposed to go please head back here and go to our weekly host the lovely Cathy Proctor and she will have a list of everyone participating and you can continue from there: Cathy's Blog

Thank you for spending some crafty time with me today, take care,


Monday 21 August 2023

Heart of Christmas - 2023 - Week 3 - Double Wonder Cards!


Welcome to week 3 of the Heart of Christmas for 2023. This week I am deviating away from fancy folds, I know that is not something everyone wants to hear but I thought I would revisit an oldy but a goody that resurfaced when I was going through some old videos I did during Covid. It is called the Double Wonder Cards. The idea is to cut your 12 x 12 DSP in such a way that you get lots of cards out of it! It was a class that Shannon West one of our Demonstrator Development Managers from the US did with us a few years ago and I did as a video class and I found it the other day and I thought perfect to get lots of Christmas cards started and ready!

As I had used the Walk in the Forest DSP last week for my Rusty Holden Ute card I thought I would use it again this week for my cards! I also used the Christmas Classics Stamp set which you will be able to purchase starting in September with our September- December mini.

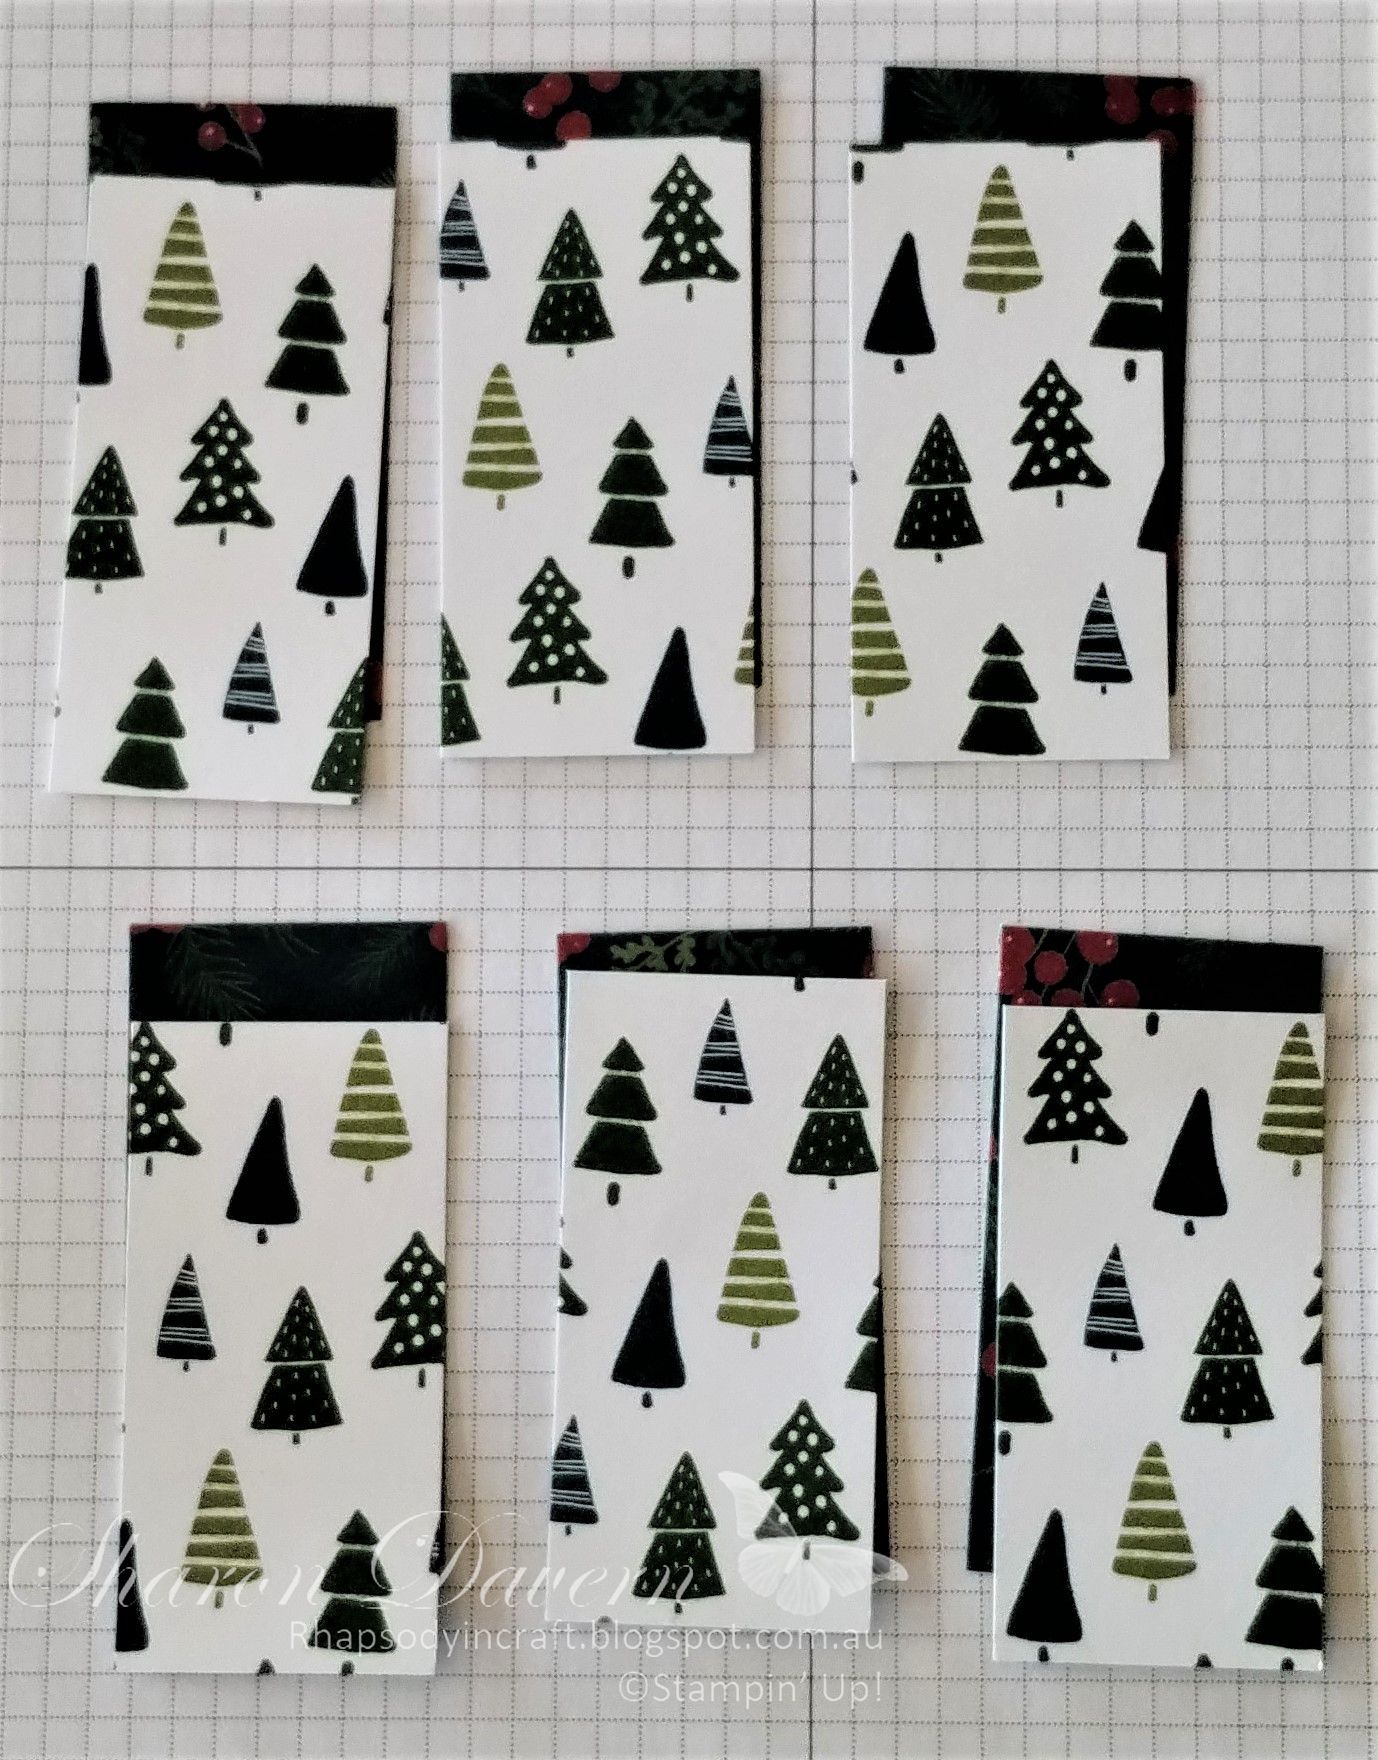
For this Double Wonder DSP set of cards you use 2 pieces of 12 x 12 DSP on top of each other and cut in half. 


Then cut at along the 12 inch side at 3 1/2 inches, then cut the next one 4 inches and you will be left with 4 1/2 inches.
It will look something like this. See there are 2nd piece is underneath. I have moved it slightly so you can see that I have cut it at the same time.
I have started with the 4 1/2 inch section and cut it in half at so the 6 inches is now 2 x 3 inches and then each strip is cut into 1 1/2 inch strips. 
As you have 2 pieces of DSP and there are 2 patterns you can mix and match the designs. I have used for the card bases the colours that are set out in the DSP that are on the back of the A Walk in the Forest Garden Green, Cherry Cobbler, Old Olive and Pretty Peacock. These are layered on a piece of basic white 3 1/4 x 5 inches. That is the base for our first 4 cards.
Now using the 4 inch middle section cut off 3/4 inch on the bottom and then cut into 1 inch sections.
I have chosen to use a Balmy Blue card base in this set. Fold your card base in half and fold 1 1/4 inch back on the front. As Shannon is an American demonstrator the measurements are for US size cards so I have cut about half a centimeter off the base off the card so that the DSP strips are not looking like you cut them too short. For the part that is folded back I adhered them to the front but you do not have to do that.
Now the final section which is the 3 1/2 section cut 2 1/4 sections twice and then the little bit that you have over is a bonus card and you cut that in half.
Remember the strip you cut off the middle section that becomes the middle strip of these 2 card bases.

The whole idea is to cut these gorgeous DSP in such a way that you get 11 cards out of them and then you can cut the other half and get another 11 cards. Stamp and punch out a greeting and you are good to go. Let's see what greeting and punch I used.

For the first card I have used both Peace on Earth and Deck the Halls and using the 2" circle punch that you can purchase in the Online store I have also added Real Red and Garden Green Ribbon Combo under the greeting which is stamped in Basic Gray and popped up on Dimensionals.
The second set of cards I have combined the Merry and the Christmas from the Christmas Classic stamp set and used the Lasting Label punch.
I have gone back to the Peach on Earth and Deck the Halls from the Christmas Classics Stamp set for the last 2 cards.
The bonus card I have used Merry Christmas.

So what did with the other 6 x 12 DSP? I am glad you asked. I started to step up these cards. The ones I have shown you so far I would consider a beginner card of paper, ink and punch and you can make some great card. Now I thought I would step up a little bit each of the cards.

Ok I have added some layers of Vellum Basics Specialty DSP and Gold Foil and cut out the Sentiment with the Deckled Circle Dies that are going to be available in the Sept-Dec Mini Oh and how cute are the Loose Holly Gems and sequins that I have attached with mini glue dots

This card again has been layered with the Vellum and Gold and as a result I didn't have to cut of the extra half a centimeter of card in the base as you can see. Keeping with my deckled circle theme I used the deckled rectangle dies to cut out the greeting on this card.

To add a little bit of extra to this card I have cut out the greeting and a layer of gold in the Deckled Cricle Dies and the Tree from the A walk in the Forest DSP and added a holly berry from the Loose Holly Gems and sequins.

Rhapsody in craft, Christmas, #rhapsodyincrat, #heartofchristmas,#heartofchristmas2023, Joy of Noel, Joy of Noel Bundle, Double Wonder DSP Cards, Art with Heart, Christmas Cards, Cherry Cobbler, #loveitechopit

I know this is different. I went rogue on this one and went to a different stamp set and die. I went to Joy of Noel. I stamped NOEL in Cherry Cobbler and cut it out using the Joy of Noel Dies. The branches are also cut using the dies in garden green.

I hope you enjoy this very quick explanation of the double wonder cards. 

If you have any questions about how to do the Double Wonder cards and would like the template please do not hesitate to contact me.


Now is the time to head to the next person on our Heart of Christmas journey and this week you will be heading to Amie McIllroy, I can't wait to see what she has for us this week, last week she made the most gorgeous Poinsettia card, so just hit the next blog button and you will go straight there.


If for any reason you have a next blog button that sends you somewhere it shouldn't just come back here and the list of the Art With Heart team are below and you can continue your journey there or you can do your whole journey from the list below.


Thank you for spending some Christmas crafty time with me today, take care,


Wednesday 16 August 2023

Colour Creations Blog Hop - Week 16 - 2023-2024 - Calypso Coral


Rhapsody in craft,#rhapsodyincraft,blending blush technique,Calypso Coral,Textured Floral,Textured Floral Dies,Blending Brushes,Birthday Card,Exposed Brick 3D embossing Folder,Stripes and Splatters 3D Embossing folders,Blending Brushes,Stampin' Up, #artwithheart,


Welcome to Calypso Coral week for our Colour Creations Blog Hop. It is a lovely colour and one I think my Dad would say is almost his favourite but I am not making a male card today I am pulling out the Textured Floral bundle and trying a new technique for me that I found from Patty Bennett.

You may have come to my blog if you are hopping along with the Art with Heart team from Theresa and I know she likes me to do fancy folds but today I am not doing that just a normal fold as I wanted to try this technique and I wasn't sure how long it was going to take me. It is not a hard technique at all I just played around with it a bit.
Here is my colour combination for my card today. So let me tell you how I put it all together using the Texture Floral stamp set and die bundle!
Rhapsody in craft,#rhapsodyincraft,blending blush technique,Calypso Coral,Textured Floral,Textured Floral Dies,Blending Brushes,Birthday Card,Exposed Brick 3D embossing Folder,Stripes and Splatters 3D Embossing folders,Blending Brushes,Stampin' Up, #artwithheart,
My base and first layer is this gorgeous rich Calypso Coral and I have embossed the layer with the Exposed Brick 3D embossing folder. Don't you just love this embossing folder? Well I do! Now came the fun part.
Rhapsody in craft,#rhapsodyincraft,blending blush technique,Calypso Coral,Textured Floral,Textured Floral Dies,Blending Brushes,Birthday Card,Exposed Brick 3D embossing Folder,Stripes and Splatters 3D Embossing folders,Blending Brushes,Stampin' Up, #artwithheart,
To get the unique colouring on the distINKtive stamps I mounted the flower stamps on blocks then got out the inks that I wanted to use. I used Lemon Lolly and Petal Pink on the flowers and then on my blending brush I had Calypso Coral. You may ask how did I do that. Well to start with I watched a video that Patty Bennet has on her page to do with any distINKtive stamps and she first uses an old bone folder and moves some of the excess ink away from the centre of your ink pad. You DO NOT want a juicy ink pad for this. Then in my case I inked either in Petal Pink or Lemon Lolly on the ink pad the flower that I wanted. Then with your blending brush you tap around the edge of your flower as much or as little the amount of ink that you want in the colour that you have chosen and of course we are using Calypso Coral today! How cool do these flowers look?!
Rhapsody in craft,#rhapsodyincraft,blending blush technique,Calypso Coral,Textured Floral,Textured Floral Dies,Blending Brushes,Birthday Card,Exposed Brick 3D embossing Folder,Stripes and Splatters 3D Embossing folders,Blending Brushes,Stampin' Up, #artwithheart,

For the leaves I have put a little bit of blending brush splodges of Mossy Meadow over Soft Sea Foam before cutting them out with the Textured Floral dies to give them a muted look and slightly different tone. I have added a little bit of linen thread and in the centre of the flowers I have cut out the stamen in basic white. Under all of this floral gorgeousness I have added 3 strips of the colours that I have used in the card as although the flowers were gorgeous it needed something to ground the floral bouquet! I embossed the strips with the Stripes Embossing folder from the Stripes and Splatters 3D Embossing folder set! Now around the edge of Calypso Coral layer and the 3 strips of card I have used the residual ink on my blending brush with Calypso Coral. Of course you always need a little bling which I have coloured the basic rhinestones with dark calypso coral blends.

If you have any questions about this card today or the technique please don't hesitate to contact me.

Now is the time to head to the next person on our journey of Calypso Coral and today you will be heading to Ros Davidson. I love her bold colours so I can't wait to see what she has put together for us today. Just click on the next blog button and you will be taken straight there.
If for any reason the next blog button doesn't quite work please come back here and head to our host for this week Tina Gillespie and she will have the list of the Art With Heart team participating today so you can continue your hop from there: Tina's Blog.

Thank you for spending some crafty time with me today, take care,


Monday 14 August 2023

Heart Of Christmas 2023 - Week 2


Welcome to week 2 of the Heart of Christmas blog hop for 2023. Each Monday up until the end of November, team members from the Art With Heart team will be bringing to you some fabulous Christmas inspiration. Card, Tags, Décor and 3D items so that you will be ready for your Christmas and Holiday festivities. I do hope you will join us each Monday at 8 p.m AEST.

This week I was eagerly awaiting my preorder from the new September - December Mini but it is yet to arrive so I am jumping on the Trucking Along band wagon. It reminds me of the Australian version of Jingle Bells in the Old Rusty Holden Ute! I will put the lyrics at the end of the blog post for those who are interested.

Well update I had not quite finished my card and putting it all together so I was able to use some of the goodies from the  new Mini pre-order.


I have made another fancy fold! I know I can’t resist but this one is super easy to make, and I know that you could do it, plus the card fits into our envelopes no problem at all!

I started with making the box for the base of the card. 4 ¼ inches by 11. Then I scored at 1,  2 ¾ ,3 ¾ ,5 ½ ,7 ¼ ,8 ¼ ,10 inches. Fold this in half at the 5 ½ inch mark and lay this in the grove of your trimmer and cut form ½ inch down to the 3 ¾ inch mark so that you have half an inch of card on each side not cut. Fold all the score lines and set this aside for later as now we get to decorate.

For the pop up section of the card I have cut a piece of Pebble Path to go with the base of the card and then some over the top I have cut a piece of Basic White and a circle using the new Deckled Circle dies from the upcoming Sept-Dec Mini. You are going to love them! Between these layers I have used the Walk in the Forest DSP 


For the tree on the front of the focal point I have used the Merriest Tree Dies and it cuts out the tree perfectly from the Walk in the Forest DSP. To create the pop-up part slide your focal point card in through the slit that you have cut fold all the score lines back into a box and adhere the 1 inch sections to either side of the focal card. I did this with tear 'n' tape to make sure it was very secure. You might be able to see from this angle better.


 I have stamped the truck twice so I could get the little trailer and I just love the little wooden railings. I have used Light and Dark Pretty Peacock and Dark Lost Lagoon to colour the truck and the rust is Bronze, Light and Dark Wild Wheat. I have colour in many colours and you can too your Christmas presents and as the truck is going over the bumpy road  a little bit too fast the presents are flying out the back of the trailer. Which if you look very closely is the embossed DSP with Stipes from Stripes and Splatters embossing folders I have them attached to a piece of window sheet!
And it folds flat to go in the envelope.

If you would like to contact me about my project today please do not hesitate to contact me.


Now is the time to head to the next amazing creative team member and this week you will be heading to Judy May, I can't wait to see what she has for us today she always comes up with gorgeous cards and last week was no exception. Just click on the next blog button and you will go straight there.
If for some reason one of the links don't work or you would rather go off a list for your blog hop, please find the list below of the Art With Heart Team who are participating in the Heart of Christmas this week.

Here is the list of those amazing Art With Team members participating today.

Tina Gillespie

Amie McIlroy

Andrea Sargent

Michele Taylor

Theresa Gerrard

Kate Morgan

Christine Blain

Rosa Leyden

Catherine Proctor

Rachel Woollard

Sharon Davern <= You Are Here

Judy May

If you would like the new September-December Mini please let me know.
Don't forget Jingle Bells in a Holden rusty Ute


Aussie Jingle Bells Lyrics

Dashing through the bush
In a rusty Holden Ute
Kicking up the dust
Esky in the boot
Kelpie by my side
Singing Christmas songs
It’s summer time and I am in
My singlet, shorts & thongs

OH, JINGLE BELLS, JINGLE BELLS
JINGLE ALL THE WAY
CHRISTMAS IN AUSTRALIA
ON A SCORCHING SUMMER’S DAY
JINGLE BELLS, JINGLE BELLS
CHRISTMAS TIME IS BEAUT
OH WHAT FUN IT IS TO RIDE
IN A RUSTY HOLDEN UTE

Engine’s getting hot
Dodge the kangaroos
Swaggy climbs aboard
He is welcome too
All the family is there
Sitting by the pool
Christmas day, the Aussie way
By the barbecue!

OH, JINGLE BELLS, JINGLE BELLS
JINGLE ALL THE WAY
CHRISTMAS IN AUSTRALIA
ON A SCORCHING SUMMER’S DAY
JINGLE BELLS, JINGLE BELLS
CHRISTMAS TIME IS BEAUT
OH WHAT FUN IT IS TO RIDE
IN A RUSTY HOLDEN UTE

Come the afternoon
Grandpa has a doze
The kids and uncle Bruce
Are swimming in their clothes
The time comes round to go
We take a family snap
Then pack the car and all shoot through
Before the washing up

OH, JINGLE BELLS, JINGLE BELLS
JINGLE ALL THE WAY
CHRISTMAS IN AUSTRALIA
ON A SCORCHING SUMMER’S DAY
JINGLE BELLS, JINGLE BELLS
CHRISTMAS TIME IS BEAUT
OH WHAT FUN IT IS TO RIDE
IN A RUSTY HOLDEN UTE


Thank you for spending some Christmas crafty time with me today, take care,

Colour Creations Blog Hop - Week 50 - Tahitian Tide - Notes of Nature Birthday

  Welcome to week 50 of the Colour Creations Blog Hop this week we are looking at the colour Tahitian Tide.  Next week we will be starting o...