Welcome to my happy place.

Hi,

Welcome to my blog. Thank you so much for stopping by. I hope that you will find some inspiration for your projects as I have from many lovely people. This is just a little space for me to share some of my cards, scrap book pages and maybe even some of my embroidery and quilting projects.

Enjoy and stop back often.

Sharon


Showing posts with label Beautiful Baubles. Show all posts

Wednesday, 31 October 2018

Stampin' Up - Heart of Christmas - Week 12


Tonight is week 12 of the Heart of Christmas and I have added a little twist to the top corner of my card tonight.

I was looking around for some different layouts and sketches that I might be able to use but then I saw this little twist that I hadn't come across before so I thought I would use it for my Christmas card this week.
Beautiful Baubles, Under the mistletoe, Stampin' Up, Art with heart, Christmas Cards, DIY Cards, Fancy Fold, Heart of Christmas, Rhapsody in craft

As you can see it has a little bit of a fancy twisted corner. I had not seen this twist before but it is kind of cool and it is so easy to do. Check out the end of my post for the photo tutorial!

Beautiful Baubles, Under the mistletoe, Stampin' Up, Christmas Card, Heart of Christmas, Art with Heart, Rhapsody in craft
Here is the corner without anything behind it. Rather a bit fancy.
For the Bauble I have stamped it in memento ink and used my Stampin' Blends to colour it in matching the colours from the Under the Mistletoe DSP that I have used on the card, which is in the Annual Catalogue! I then decided they were a little bit bold so I muted it slightly with the Frost White Shimmer Paint which I applied using a sponge dauber. I cut the bauble out with the stitched shape framelits and popped it up on some dimensionals and added the shimmery black organza ribbon. It has become one of my favourite ribbons from the holiday catalogue!

Beautiful Baubles, Christmas Cards, Heart of Christmas, Rhapsody in Craft,

I have layered the inside of the card and stamped this beautiful saying. When you close the card the layers look fantastic in the top corner.
Beautiful Baubles, DIY Cards, Christmas Cards, Rhapsody in Craft, Art with Heart, Heart of Christmas, Stampin' Up,

Hope you have enjoyed this weeks Heart of Christmas card. Make sure you pop on over to my lovely friend Claire Daly's blog and see who else is hopping along with some Christmas inspiration.

Please don't hesitate to contact me if you need any craft supplies of would like help in making this card.

Now for a look at how to make the corner of your card.
I actually folded my card base in half just so I could get my head in the correct spot where the twist needed to be. I have photographed in Night of Navy so you can see the contrast.
This is the top corner that you will need to cut. The whisper white square is the size of the square that that needs to be cut. It is 7.5 cm square. I cut it as a guide so you could see what I was doing.

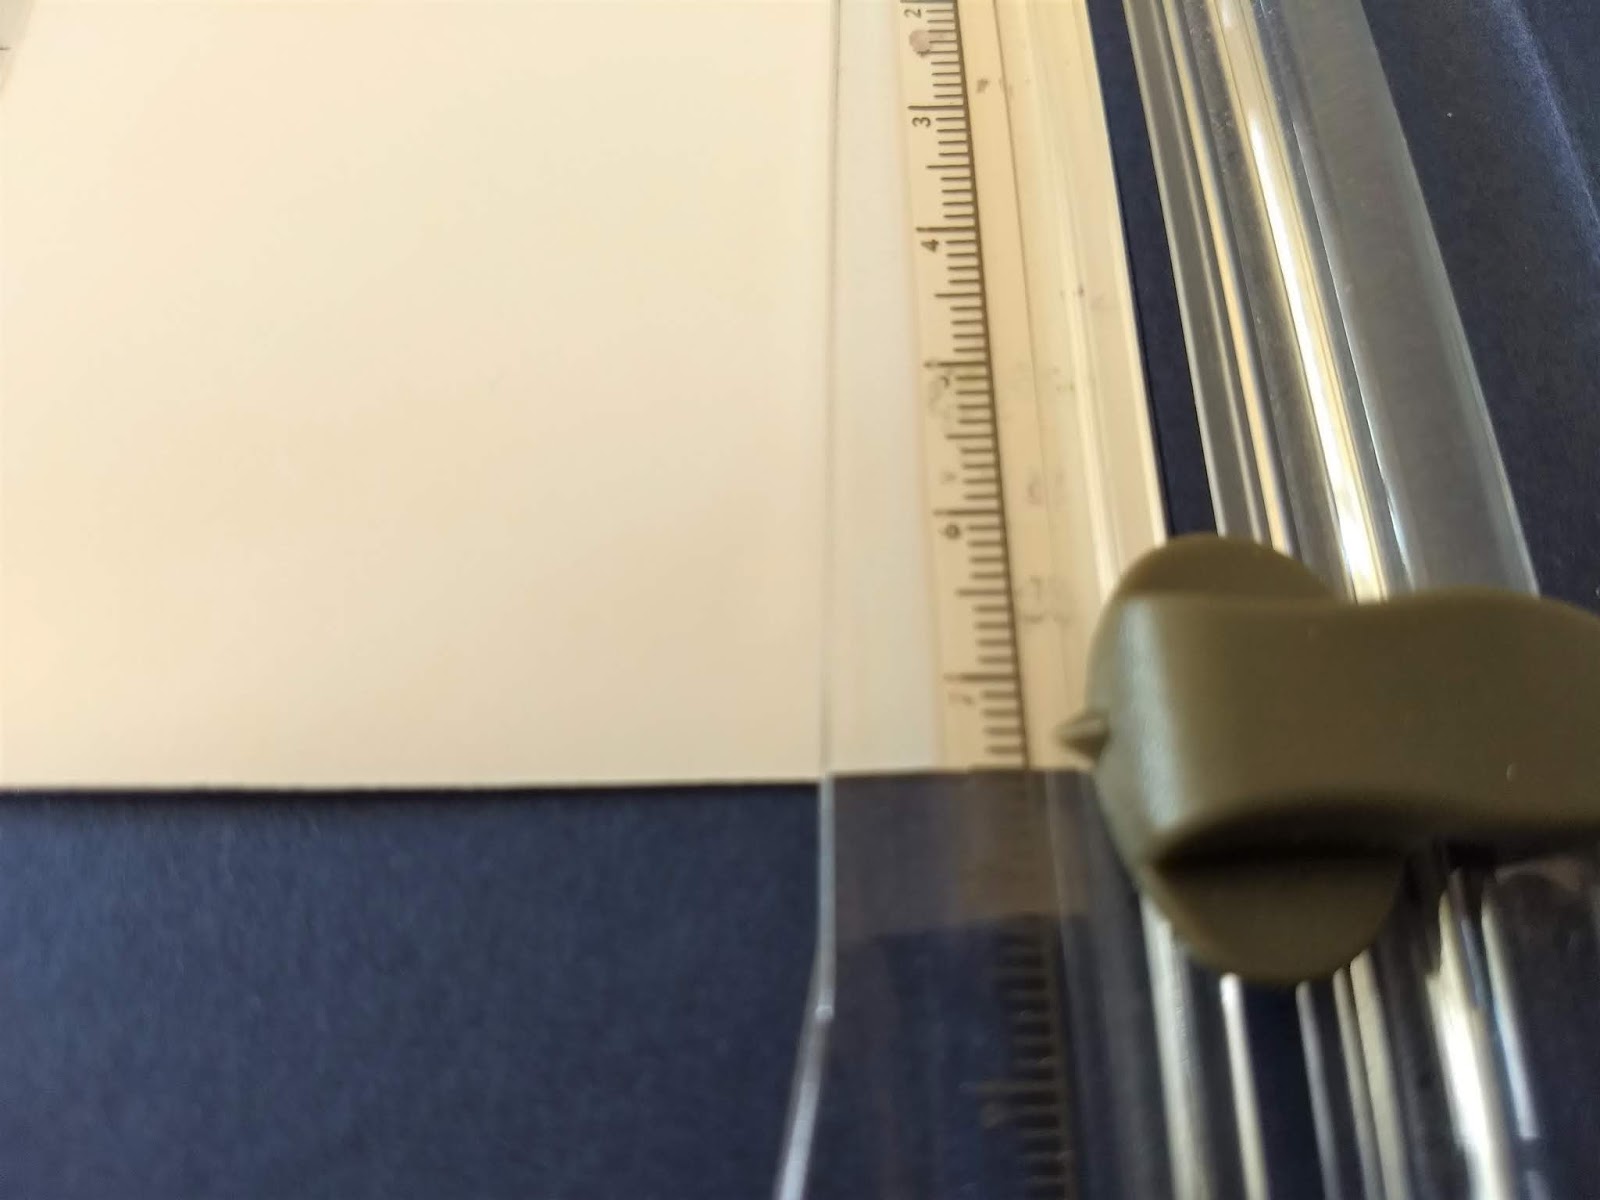
It this first cut I turned the over so that the middle fold of the card base is to your right hand side and the edge of your card is lined up with 7.5 on your trimmer.


Now move your blade to the 1 cm mark DO NOT CUT DOWN TO THE MARK just move to that spot. You will start cutting from this spot.

Now cut down to the 7.5 cm mark

 Now flip your card back over so that it looks like this with the cut mark at the bottom and the fold line still on the right hand side and line the edge of your card up at the 7.5 cm mark on your trimmer.
Now repeat the steps that we did before.


Move your blade down to 1 cm mark. DO NOT CUT. We will start cutting from here.

Cut down to the 7.5 cm mark.


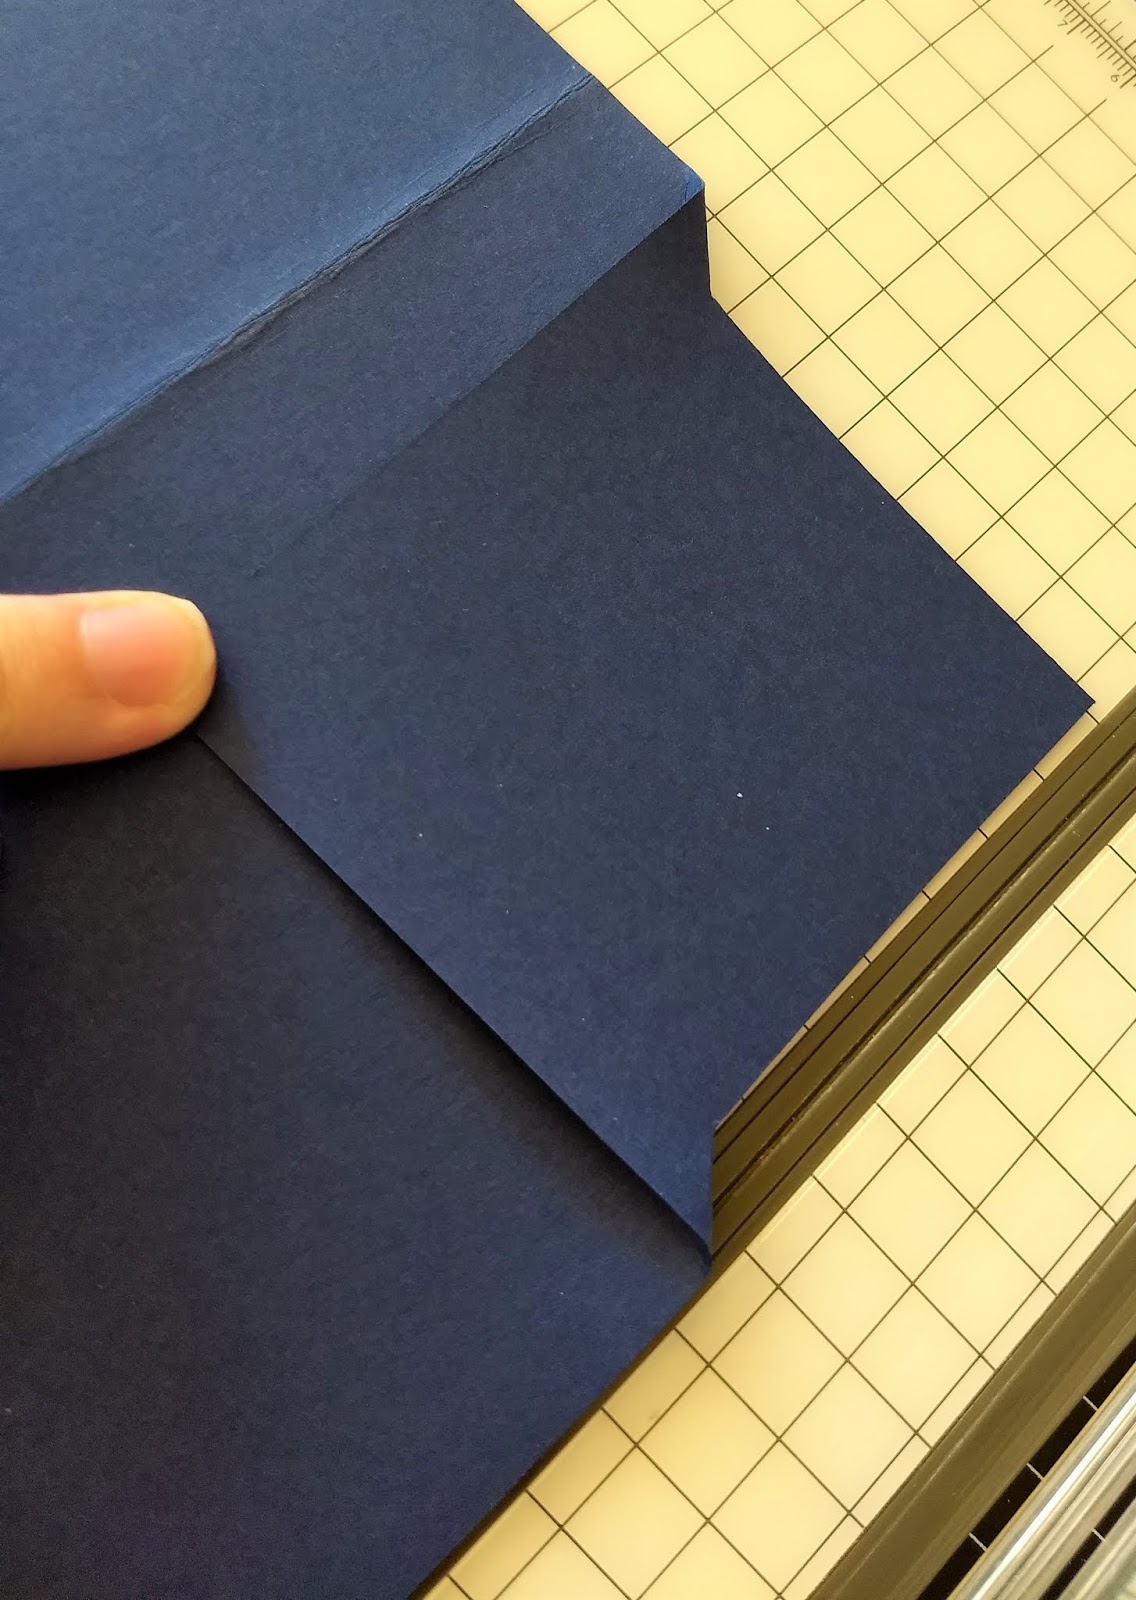
Now your card should look like this with the cuts joining up.

Fold your card base back over so that the cut is in the tip right hand corner of your card.

Now swing the cut card through the hole that you have created and then use your bone folder to burnish the 2 little corners


After you have decorated your card front to your liking adhere down the part of the card base that you have swung through so that it stays down and you can decorate it in anyway you like.

There you go. Let me know if you need help with these instructions. Let me know if you try to make this card yourself. I would love to see what you have made.

Thank you for spending some time with me tonight.
Take Care,

Thursday, 20 September 2018

Stampin' Up - Art With Heart Team blog Hop September 2018 - Holiday Catalogue


Tonight the Art with Heart team are sharing creative projects featuring the Holiday Catalogue. We hope our blog hop inspires you to get creative and make some fabulous Christmas creations. If you would like a copy of the Holiday Catalogue, contact any of the girls on the blog hop and we will get in touch with you.

Tonight I have used the gorgeous Beautiful Baubles Bundle on page 10 of the holiday catalogue and together with a fancy fold that I found on Flutterbyheidi called a fan fold card and here is my fun card for tonight.
Beautiful Baubles, Christmas Cards, Art with heart, fancy fold

I have done 2 versions for you. The 2nd I stepped it up a little and used the Detailed Bauble Thinlit dies.

So how did I make these 2 cards.
Beautiful Bauble, Christmas Card, Art with heart, fancy fold
Card one I have used my Stampin' Blends. You can choose what ever colours you would like to use but I like the colours that blend nicely with the cherry cobbler and mossy meadow card stock that I have used for my card base.
 I first coloured a panel that was 10.5x7.5 cm

This panel is 14x2 cm but then I decided to back it with the mossy meadow card stock so I trimmed it down a little bit.

The fan section of the card is 14.5x17.5 cm and you score at 2.5, 5. 7.5, 10, 12.4 and 15 cm

This is the back panel that you adhere to the  fan and is cut at 14.5 x 10.5 cm
Adhere to the back fan.

 Cute your coloured panel into 3 even sections 3.5 cm wide

These panels are 4 x 10 cm.
You could also make an extra layer if you would like.
Adhere your coloured panels to the right had side of these panels and then adhere the top panel on the back layer first. Second adhere the bottom panel in the firs t fold of the fan and then the middle panel in the middle fold of the  fan to make sure they are all evenly spaced.

Beautiful Bauble, Frosted Floral, Christmas Card, Fancy fold
For the Second card I have used copper foil to cut out the gorgeous baubles from the detail bauble thinlits and backed them with Frosted florals Specialty DSP on Page 37


Now it’s time to hop on over to our next participant, the very talented,   Tina Gillespie.   
If you find a broken link or have come to this blog hop from a different entry point, you can view the participants below:

Caroline Manwaring
Sharon Davern
Tina Gillespie
Ros Davidson

Please contact me if you would like any help with this card or would like a Holiday Catalogue

Thanks for spending some time with me today 


Wednesday, 5 September 2018

Stampin' Up - Heart of Christmas - Week 4


*****EDIT****
For the lovely people who have requested the instructions for this card. I have tried to send them to everyone. If you have not received them please send me an e-mail request to rhapsodyincraft@outlook.com and I will resend you the instructions. Thank you so much ******


Tonight for the Heart of Christmas I have used the gorgeous Beautiful Baubles stamp set and got out my Stampin' Blends and Decked the Halls.

Beautiful Baubles, Christmas cards, fancy fold, Art with heart

I have used the stamparatus to stamp the side panels several times of the group of  Beautiful baubles so I could line them all up perfectly.

Beautiful baubles, stampin' up, Christmas cards, fancy folds, Art with heart

This fancy fold I found on our Stampin'  Up Demonstrator Planning Place by Lynne Hemphill so if you would like the measurements just contact me and I will pass them on.

The Gorgeous DSP I have used is the Festive Farmhouse  which is in the new Holdiay Catalogue which is available to purchase from today, so all these goodies are now available. Plus don't you just love this sparkly black ribbon? It is the Black Glittered Organdy Ribbon in the new Holiday Catalogue, you just have to have some for all your projects!

Beautiful Baubles, Christmas Cards, Fancy folds, Stampin' Up, Art with heart
I have used many different soft colours of Stampin' Blends to colour my baubles to go with the cherry cobbler base what would you choose.

Make sure you hop on over to our team leader the lovely Claire Daly's blog to see who else is hopping along for the Heart of Christmas this week.

Thanks for spending some time with me, take care


Thursday, 23 August 2018

Stampin' Up - Art With Heart Team Blog Hop August 2018 - Coloured In Images Theme


Tonight the Art with Heart team are sharing creative projects featuring stamp sets that you can colour in. 

We hope our blog hop inspires you to pick up some stampin’ write markers, watercolour pencils, stampin blends or another form of colouring medium and colour in with your stamps.

Don’t forget to contact any of the ladies on the blog hop to order any products, especially they limited edition colour your season products.

Beautiful Baubles, In Every Season, Swirls and Curls, Christmas Cards

I have made a Christmas card for you tonight using the Beautiful Baubles and In Every Seasons stamp sets.

The In Every Seasons stamp set has a poinsettia stamp so I thought I would make a wreath out of this lovely flower. I can’t remember seeing many if any ponsettias in real life until my husband and I moved to live in the United States back in 1993 which is a life time ago. Now back in Australia they are everywhere at Christmas.

I stamped a number of them onto water colour paper with memento ink and then got out the  2nd assortment of water colour pencils that are available until the end of this month.

 I used cherry cobbler, flirty flamingo, crushed curry and garden green. Then I went over them with the blender pen as it has a finer tip than the aqua painter. After I was happy with all of the flowers I used the wink of stella to add some bling. Everyone needs bling at Christmas.


As you can see I needed to cut them out to make my wreath, but I think it was worth it. I adhered them to the very vanilla background that had been put through the bigshot and the new swirls and curls textured impression embossing folder. Isn’t it just lovely?

Now for the sentiment I used the new Beautiful Baubles set coming out in the holiday catalogue for that as I thought it fitted so nicely with the poinsettias. I have heat embossed copper onto shimmery white card stock and then cut it out with the stitch shaped framelits. Before adhering that over the top of the flowers I added some copper metallic thread.
Beautiful Baubles, In Every Season, Swirls and Curls, Christmas Cards

No wreath is finished without a bow so the copper trim is perfect for this card to finish it off. And everything is added to the base card of cherry cobbler.

 Now it’s time to hop on over to our next participant, the very talented, Rachel Woollard

If you find a broken link or have come to this blog hop from a different entry point, you can view the participants below:


If you have any questions about tonights card don’t hesitate to contact me or if you would like the new Holiday Catalogue.

Thank you for spending some time with me today.
Take Care


Heart of Christmas 2025 - Week 13

  We have come to the last Heart of Christmas blog hop for 2025, I am so glad that you have been on the  journey with us this year. So for t...