Welcome to my happy place.

Hi,

Welcome to my blog. Thank you so much for stopping by. I hope that you will find some inspiration for your projects as I have from many lovely people. This is just a little space for me to share some of my cards, scrap book pages and maybe even some of my embroidery and quilting projects.

Enjoy and stop back often.

Sharon


Thursday, 23 August 2018

Stampin' Up - Art With Heart Team Blog Hop August 2018 - Coloured In Images Theme


Tonight the Art with Heart team are sharing creative projects featuring stamp sets that you can colour in. 

We hope our blog hop inspires you to pick up some stampin’ write markers, watercolour pencils, stampin blends or another form of colouring medium and colour in with your stamps.

Don’t forget to contact any of the ladies on the blog hop to order any products, especially they limited edition colour your season products.

Beautiful Baubles, In Every Season, Swirls and Curls, Christmas Cards

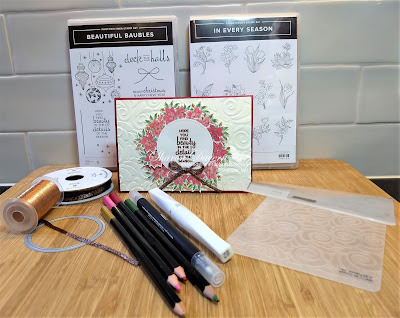
I have made a Christmas card for you tonight using the Beautiful Baubles and In Every Seasons stamp sets.

The In Every Seasons stamp set has a poinsettia stamp so I thought I would make a wreath out of this lovely flower. I can’t remember seeing many if any ponsettias in real life until my husband and I moved to live in the United States back in 1993 which is a life time ago. Now back in Australia they are everywhere at Christmas.

I stamped a number of them onto water colour paper with memento ink and then got out the  2nd assortment of water colour pencils that are available until the end of this month.

 I used cherry cobbler, flirty flamingo, crushed curry and garden green. Then I went over them with the blender pen as it has a finer tip than the aqua painter. After I was happy with all of the flowers I used the wink of stella to add some bling. Everyone needs bling at Christmas.


As you can see I needed to cut them out to make my wreath, but I think it was worth it. I adhered them to the very vanilla background that had been put through the bigshot and the new swirls and curls textured impression embossing folder. Isn’t it just lovely?

Now for the sentiment I used the new Beautiful Baubles set coming out in the holiday catalogue for that as I thought it fitted so nicely with the poinsettias. I have heat embossed copper onto shimmery white card stock and then cut it out with the stitch shaped framelits. Before adhering that over the top of the flowers I added some copper metallic thread.
Beautiful Baubles, In Every Season, Swirls and Curls, Christmas Cards

No wreath is finished without a bow so the copper trim is perfect for this card to finish it off. And everything is added to the base card of cherry cobbler.

 Now it’s time to hop on over to our next participant, the very talented, Rachel Woollard

If you find a broken link or have come to this blog hop from a different entry point, you can view the participants below:


If you have any questions about tonights card don’t hesitate to contact me or if you would like the new Holiday Catalogue.

Thank you for spending some time with me today.
Take Care


Wednesday, 22 August 2018

Stampin' Up - Heart of Christmas - Week 2


Hello and welcome hope you have had a beautiful day.

It is week 2 of Christmas inspiration and I have used the gorgeous Merry Merlot card stock as my base and paired it with the Joyous Noel Specialty Designer Serious Paper, you are going to love this DSP when you get your hand on it.
His Light, Illuminated Christmas, Joyous Noel DSP, Christmas Cards, Heart of Christmast

My card is a simple layout this week. I have firstly heat embossed copper stars from the Illuminated Christmas on the base card who doesn't like copper? Another reason to love the Joyous Noel Specialy DSP. Then I cut a small 1 1/2 inch strip of the DSP layered it with Sahara Sand and Traquil tide before adding that to my card base.

Now for the beautiful copper sentiment on the front. I have heat embossed in copper Rejoice from His Light stamp set and then Christ is Born from the same set underneath it on  shimmery white card stock before layering it with sahara sand and tranquil tide. It came up just gorgeous on the shimmery white  card stock. I used the exquisite Merry Merlot and copper reversible ribbon around the sentiment before adhering it to the card.
His Light, Illuminated Christmas, Joyous Noel DSP, Christmas Cards, Heart Of Christmas

On the inside of the card we need to decorate as well and I took a strip of the Joyous Noel DSP layered it with the tranquil tide card stock to edge the inside. The saying for the middle of this card comes from Illuminated Christmas but pairs so well with His Light stamp set.
His Light, Illuminated Christmas, Joyous Noel DSP, Christmas Cards, Heart of Christmas

If you have any questions don't hesitate to contact me or to get your hand on the upcoming Holiday catalogue where you will be able to purchase these great stamp sets and designer series paper to make your own Christmas cards.


Don't forget to hop over to Claire's Blog to see who else is sharing in week 2 of The Heart of Christmas.

Thank you for spending some time with me today
Take Care

Tuesday, 21 August 2018

Stampin' Up - Art With Heart Colour Creations Blog Hop Week 12 - Coastal Cabana


Welcome to another week of gorgeous colour creations from the Art With Heart team. This week Coastal Cabana is our focus and it is just a beautiful colour and I am so glad that it is one of the returning colours in the revamp this year.

Each week Cathy is hosting our blog hop so make sure you pop on over to her blog to check out the list of others who are sharing inspiration on this colour this week!

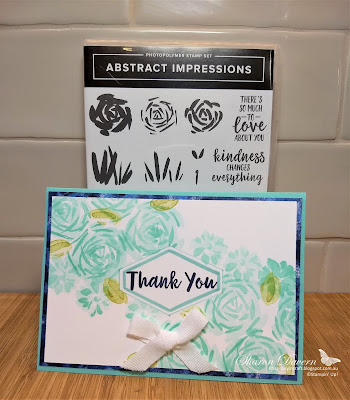
For my card this week I have used the Abstract Impressions stamp set. I think this is just the most beautiful stamp set and reminds me so much of the the beautiful paintings of Monet and Van Gogh. The absolutely gorgeous DSP that I have used with this stamp set is the Garden Impressions and it is simply beautiful.
Abstract Impressions, Costal Cabana, Garden Impressions, Stampin' Up, Thank you cards,

To make this card I punched out a mask with the Tailored Tag punch just in a piece of paper.
From this starting point I started to stamp my flowers in the gorgeous Coastal Cabana. I first stamped the background stamp off on a piece of paper and then onto the card so that the ink was a little bit lighter. Then I stamped the thinner darker lines in full strength coastal cabana ink.
Abstract Impressions, Coastal Cabana, Stampin' Up

When you have finished putting as many flowers as you would like and a few leaves in old olive take off your mask and you are left with a lovely clean area to stamp a sentiment. I then put my card in the stamparatus to make sure that I had my thank you in the correct spot and also so I can stamp over it again if I wanted to to make sure it is just the right amount of dark. I did this in Night of Navy.
Abstract Impressions, Thank you card, Garden impressions, Stampin' Up, DIY cards, Coastal Cabana

As you can see I have drawn around the edge of the shape of the mask with my Stampin' Write marker and it gives it such a look of depth and that I have stamped flowers all the way under the sentiment. I added a little bow of ribbon as I just love ribbon but you could definitely leave it out and it would be just such an easy card to pop in the post to one of your friends. The ribbon is the Classic weave ribbon in whisper white.
Abstract Impressions, Garden Impressions, Tailored Tag, Thank you card, Stampin' Up, DIY Cards
When I was putting this card together I asked my daughter what she thought and she thought that putting the card on a Coastal Cabana base might be too much. I hadn't put it together at that stage and she thought maybe a white card base. Well, I thought I would make it in both card bases and let you decide. Sarah and I have decided which one we like the best, how about you?

Don't forget to hop over to Catherine's blog to see who else is playing with Coastal Cabana this week.

If you have any questions about how to make this card or would like the supplies to make this fun and easy card don't hesitate to contact me.

Thank you for spending some of your time with me today
Take Care
Thursday, 16 August 2018

Stampin' Up - Heart of Christmas - Week 1


Hello and welcome to another beautiful day.

Today the Art With Heart team are starting 12 weeks of Christmas inspiration for you. Cards, tags, gift boxes, decorations, you name it you will be sure to find it in the next few weeks from one of the team.

I love Christmas, so I am excited that it is time for the Heart of Christmas.

For my first week I am using the new stamp set that will be available on September 5 in the New Holiday Catalogue called Illuminated Christmas. I have cased the card in the new catalogue but changed it a little.

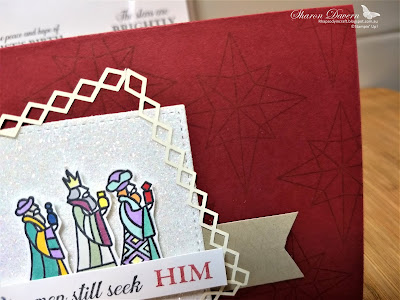
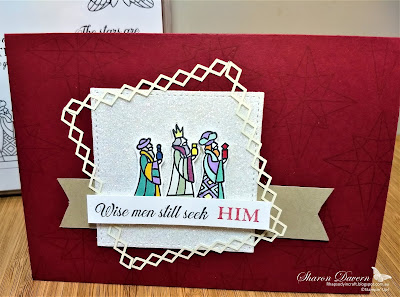
I really love this stamp set with the wise men. I have stamped the wise men in memento ink then coloured them using the Stampin’ Blends and so easy to colour. I then cut them out and popped them up on some dimensionals on a piece of Sparkle Glimmer Paper cut out with the stitched shaped framelits dies.
Illuminated Christmas, Heart of Christmas,

I have used the delightfully detailed laser-cut Designer series paper to make the frame which I have attached with the fine tip glue pen.

I have adhered this to a base card of Cherry Cobbler which I have stamped the gorgeous star from the Illuminated Christmas stamp set in cherry cobbler ink and then laid a strip of crumb cake card stock flagged at each end.
Illuminated Christmas

For the sentiment on the front of the card I had to use a fun little trick that I remembered seeing once as the word “Him” is under the rest of the words “Wise men still seek” on the stamp. What I did was get a piece of sticky tape or sellotape over the word “Him” then inked my stamp up in memento ink took of the sticky tape and stamped the words. Cleaned my stamp then put the sticky tape over the other words and inked up the word “Him” took off the sticky tape and stamped “Him” next to the rest of the sentiment.

Then I just used my snail at adhered it to the bottom of the wise men.
Illuminated Christmas, Heart of Christmas, Christmas Cards

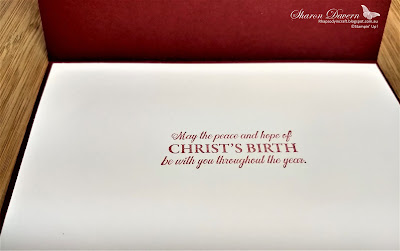
On the inside of my card I used the beautiful saying that comes with the stamp set to finish off my card.
Illuminated Christmas

I will pop a list of all the colours I used of my Stampin’ Blends to colour my wise men at the end of my post but for now if you would like any more information on how to make this card or you would like to  get your hands on the new holiday catalogue so you can get this gorgeous stamp set which is available on September 5 please contact me.

Please hop on over to our lovely team leader, the gorgeous Claire Daly to see who else is hopping along for The Heart of Christmas week 1.

Thank you for spending a little time with me today
Take Care

Here is the list of the Stampin’ Blends that I used:
Light Pool Party
Dark Pool Party
Light Pineapple Punch
Dark Pineapple Punch
Light Soft Sea Foam
Dark Soft Sea Foam
Light Blackberry Bliss
Light Smoky Slate
Light Night of Navy
Light Bermuda Bay
Light Pumpkin Pie
Dark Poppy Parade
Light Highland Heather
Light Crumb Cake
Dark Daffodil Delight

Tuesday, 14 August 2018

Stampin' Up - Art With Heart Colour Creation Blog Hop Week 11 - Cherry Cobbler

Hello and welcome to week 11 of colour creations with the Art with Heart team. This week we are looking at the beautiful colour "Cherry Cobbler".

I love making cards with this gorgeous colour and especially Christmas cards, I really like it as my Christmas red. I did not make a Christmas card this time however come back Thursday for the start of The Heart of Christmas where some of the Art with Heart team will be sharing in a Christmas project inspiration blog hop.

Tonight, I have made 1 card for you highlighting the gorgeous Cherry Cobbler.
Beautiful day, Love you to pieces,puzzle pieces thinlits dies, cherry cobbler, stampin' blends

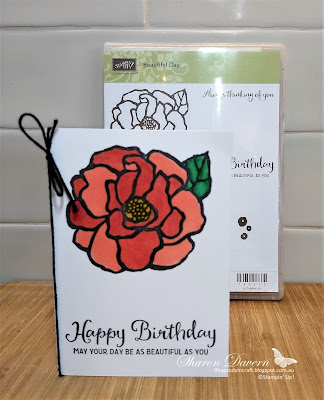
I have stamped the lovely flower from Beautiful day just like I did with last weeks cards and this week coloured them using the Stampin’ Blends of Cherry Cobbler, Daffodil Delight and Old Olive. The Lighter coloured flower is Petal Pink.

The Colour Coach that Stampin’ Up has given us suggest Petal pink as a lovely colour to use with Cherry Cobbler so I did. I just added a couple of others as well. What colours would you add to cherry cobbler?

Once I had finished colouring my beautiful flowers I decided I wanted to use my jigsaw famelit from the Puzzle Pieces Thinlits Dies and cut them out. So, I did then I used my tombow glue and glued them back together onto a piece of whisper white before adhering it to a card base of Cherry Cobbler.
Of course, the card really wasn’t finished I had to add some ribbon and in the upcoming holiday catalogue there is this gorgeous sparkly Black Glittered Organdy Ribbon. If you are like me, you just have to get your hands on this ribbon.
Beautiful day, love you to pieces, puzzle pieces thinlit dies, cherry cobbler

The sentiment on the card is stamped in Cherry cobbler using my stamparatus in case I wanted to stamp more than once, and I did want to (just to make sure it was really dark and cherry cobblery like) using the stamp set Love you to pieces and cut out again using the single jigsaw piece from Puzzle Pieces Thinlits Dies.
Love you to Pieces, cherry cobbler

On the inside of the card I have stamped the outline of a puzzle piece and a cute sentiment to finishe off the phrase of “Love you to pieces….One piece at a time”

 If you would like any help in making these cards or ordering supplies to make them don’t hesitate to contact me.

Make sure you hop on over to Catherine Proctor’s Blog to see who else is playing along this week from the Art With Heart Team.
If you would like a copy of the  Annual Catalogue  and the new Holiday Catalogue that is coming out or have any questions please contact me.


Thank you for spending a little bit of time with me today.
Have a lovely day, take care


Tuesday, 7 August 2018

Stampin' Up! - Art With Heart Colour Creations Blog Hop Week 10 - Calypso Coral


Tonight, some of the ladies of the Art With Heart Team will be bringing you a blog hop featuring one of the gorgeous colours from the Stampin’ Up range. Each week the lovely CathyProctor will be hosting the blog hop and we will be going through the colours in the range in alphabetical order. This week “Calypso Coral ” is up.


Tonight I have made 2 very quick note cards that I have cased from the annual catalogue to highlight this very beautiful colour calypso coral. If you look on page 205 of your Stampin’ Up Catalogue you will find the card that I have made for you tonight.

 It is one of the “You Can Make It” projects in the catalogue.  You can order all the products you need to make this card with just one item number. How great is that?! You get the stamp set, the clear block, pack of note cards, memento pink pad, both stampin’ blends and solid bakers twine. Now you are ready to make 20 note cards and you didn’t have to worry about anything just put in 1 number. If you would like to see what the other “You Can Make It” projects are check out page 2 of the catalogue.

Here is the card in the catalogue from Stampin’ Up made with Lovely Lipstick which is just a beautiful pink colour!


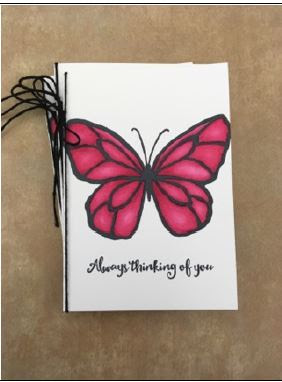
So, for my cards I have used the Calypso Coral Stampin’ Blends both the light and the dark and for my second card I used the same stamp set and used the gorgeous flower and birthday sentiment and added a couple of more colours. Dark Daffodil Delight and both light and dark Call me Clover.
Beautiful Day, Calypso Coral, Stampin' Blends, Art With Heart, alcohol markers

The Stampin’ Blends are so easy to use and give such a beautiful finish on your cardstock that you will just love them.

Beautiful Day, Calypso Coral, Stampin' Blends, Art with heart, alcohol markers
When stamping my images onto the note cards I used my Stamparatus to make sure that everything was lined up correctly as the note cards are small and also so I could re-stamp in the exact same position if I wanted the black memento ink to be a little darker. If you don't have a stamparatus yet you have got to get one. I just love it!
Beautiful Day, Calypso Coral, Stampin' Blends, Art with heart, alcohol markers
Ok I may have fibbed I have just put together another very quick card so make that 3 cards for tonight. These note cards are fast and with the Stampin' Blends they are just so lovely to colour with. Make sure you come back for our team blog on August 24th which is all about colouring techniques.

Well I used the host set Artfully Folded for my cheeky quick 3rd note card and the gorgeous Garden Impressions DSP with the Calypso Coral Stampin' Blends to make this card.
Artfully folded, garden impressions dsp, art with heart, calypso coral, stamparatus
This stamp set is /can be a 2 step stamp set with you having a solid image stamp in the set so you can stamp the colour of your cranes as well as the outline but tonight I decided to  use my Calypso Coral Stampin' Blends to colour them in and I quite like them. What do you think? Plus the Garden Impressions Designer Series Paper is quickly becoming one of my favourites this year!

 If you would like any help in making these cards or ordering supplies to make them don’t hesitate to contact me.
Make sure you hop on over to Catherine Proctor’s Blog to see who else is playing along this week from the Art With Heart Team.

If you would like a copy of the Annual Catalogue or have any questions please contact me and keep your eye out for the new Holiday Catalogue coming out next month!

Thank you for spending a little bit of time with me today.

Have a lovely day, take care


Colour Creations Blog Hop - Week 34 - 2024 -2025 - Melon Mambo - Spotlight on Nature Birthday

  Welcome to week 34 and Melon Mambo Week!  Can you believe that we are one week before Christmas? I can't but I love Christmas as it is...