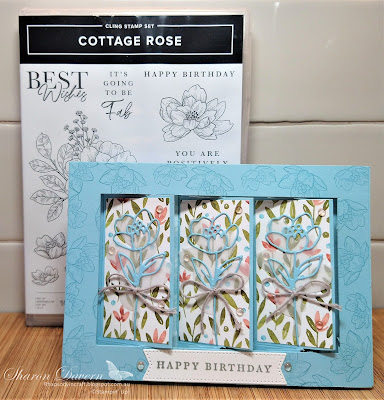
This week for our Colour Creations Blog Hop we are heading back to our gorgeous staple colours and will be going in alphabetical order. So we are looking at Balmy Blue.
I have recently purchased the Abigail Rose suite and I am loving it and I have made a few cards for the next few weeks using the stamp set and dies but I have not used the other elements in the suite yet I will have to get on to that! So keep an eye out to see how I have just loved using this rose in a few cards. Well I thought I had better get back to making a fancy fold and this is one I hadn't made before so here goes!
So this card has many elements to it and I followed along with a video that I found and adapted from a UK Stampin' Up! demonstrator Jan B. I will add her link at the end of the blog if you wish to have a look at how she put it all together.
As you can see there are quite a few elements to the card.
So what did I do.
I first cut 3 pieces of Balmy Blue Card the same size of the front of a card base and a card base. I set the card base aside.
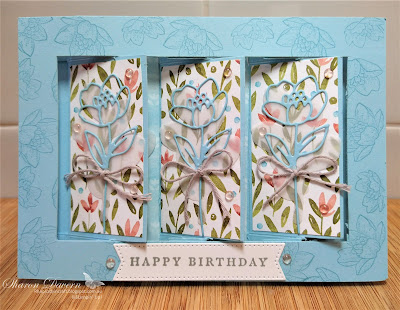
On one of the 3 other pieces in Balmy blue ink I stamped around the edge the 3 flower rose stamp.I then adhered it to one of the other pieces that I had cut and set it aside to dry while I got to work on the hinge mechanism.
I decided to use the Awash in Beauty DSP as it has Balmy Blue as one of the colours. Plus how gorgeous is this paper!!! So I used this side as the front and then turn it over and I used the back.....For the inside of the back of my hinges.
Now we have to put it all together.
Cut out the centre of the stamped card. Now I did cut it out at 5/8 inches from each side which is around 1.58 cm so you chose which measurement you would like to use but it is quite easy to do on the trimmer at 5/8 inches.
On the 3rd piece of Balmy Blue card it is time to add your hinges. lay the first one down all the way to the left just adhering the tabs at the top and bottom then with that folded open butt the second hinge right up against the first hinge and adhere it and then the third hinge right up against the second.
Before adding the top I have added another piece of the Awash with Beauty DSP between each hinge not only to decorate but to hide the hinge mechanism.
Place some glue on each hinge and then starting with them closed and the non Balmy Blue side up start at the right hand side and slowly place the top over the hinged with the glue facing up.
I decided I didn't want to stamp the flowers for each of the shutters so I went to the Cottage Flower Dies that come in the bundle or with the Abigail Rose Suite if you are able to buy the whole suite. I cut out the leaves in vellum and then the flower in Balmy Blue and adhered them onto the gorgeous Awash with Beauty DSP and some Baker's twine to finish each flower off.
I wasn't finished there I stamped the Happy Birthday and cut it out with the new Stylish Shapes Dies. I told you last week you needed these dies and this one fit perfectly on my card. I also added some Polished Dots from the Jan-June Mini so if you want them get them now as they are retiring.
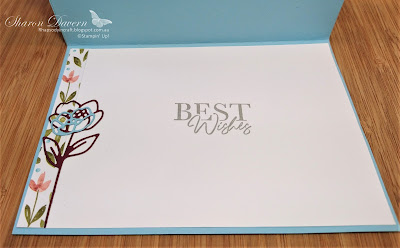
Well of course you can't have a shutter card without something behind the shutters so I have cut out the flowers this time in Merry Merlot to match the Awash with Beauty DSP and a little one in Balmy Blue and placed them on a Vellum Leaf. I also stamped another of the sentiments from the Cottage Rose stamp set and cut it out using the Stylish Shapes Dies so now the front of our card is complete.
Here is a little video I had my daughter hold the card and open and shut it so you could see how it works.
Hope you liked this card, it was fun to make. If you would like any help with this fancy fold or any of the products please do not hesitate to contact me.
Now is the time to head to the next person in our Balmy Blue journey. Just hit the next blog button and you will go straight there. I love to see what Andrea makes it is always so beautiful and I can't wait for her creation this week.
If at any time there is a glitch or a problem with the next blog button just come back to here and head over to our host of the Colour Creations Blog Hops the lovely Cathy Proctor: Cathy's Blog.
Thank you for spending some crafty time with me today, take care,
If you would like to see how Jan B put together her card and watch the video I watched to work off to make my card here is the link https://www.youtube.com/watch?v=Ut0sGU9_h4Y


.jpg)
.jpg)

.jpg)
9 comments:
Wow, amazing card Sharon! How clever are you? Those rose die cuts look lovely on the screens
What an incredible fancy fold, Sharon, and thank you so much for the time you have invested in showing how to make your gorgeous card!
Wowzers, that's an amazing card! The video was set to private, so I couldn't watch it, but I can imagine how spectacular it looks opening and closing.
Wow, o wow. I love your fancy fold card - so clever. I haven’t seen it open and close and the lifting of the front flap - a great video too. I have wanted to create a card with this fold so thank you so much for the details. Love your decoration of the panels - all so gorgeous. Xxx
Wow what a fabulous shutter card and big impact! That DSP is so pretty with the die cut flowers. Thanks for sharing the instructions Sharon.
A great interactive card, Sharon. I too saw Jan's video of this, but put it aside to try another day. It is lovely with the Cottage Rose bundle and Balmy Blue brings a lovely freshness. You've decorated the panels beautifully.
Wow Sharon so so much work has gone into not only making this lovely fancy fold card but also the photographing of all the steps.I hope the recipient appreciat4es all of the work you have done to create this beautiful card.
What a glorious way to show off Balmy Blue. Love, love, love it!The shuttercard really blows me away, I'm not that great at these tricky ones.
Now, this is pretty spectacular! Thanks for walking us through the steps, to create it, Sharon ... it helped me understand, but there's no way I would tackle such a project! You have so much more patience (and technical skill) than I. Fabulous card, love.
Post a Comment